Cómo fusionar archivos de audio: una guía para ediciones perfectas
Aprende a fusionar archivos de audio sin problemas. Nuestra guía cubre herramientas gratuitas como Audacity, FFmpeg de línea de comandos, unidores en línea y consejos profesionales para creadores.
Kate, Praveen
December 4, 2024
En esencia, fusionar audio es simplemente combinar varios clips de sonido en una sola pista continua. Puedes lograr esto con software dedicado como Audacity, herramientas de línea de comandos como FFmpeg, o incluso simples unidores de audio en línea. El verdadero truco es organizar tus archivos en la secuencia correcta antes de exportarlos como un solo archivo unificado.
IA de última generación
Impulsado por Whisper de OpenAI para una precisión líder en la industria. Soporte para vocabularios personalizados, archivos de hasta 10 horas y resultados ultra rápidos.

Importar desde múltiples fuentes
Importa archivos de audio y video desde diversas fuentes, incluyendo carga directa, Google Drive, Dropbox, URLs, Zoom y más.
Exportar en múltiples formatos
Exporta tus transcripciones en múltiples formatos incluyendo TXT, DOCX, PDF, SRT y VTT con opciones de formato personalizables.
Por qué podrías necesitar fusionar archivos de audio
Antes de entrar en el cómo técnico, vale la pena entender por qué necesitarías hacer esto. Fusionar audio es una habilidad fundamental en la producción, que convierte un montón de grabaciones separadas en un producto final pulido. La necesidad de unir archivos de audio surge en todo tipo de proyectos profesionales y personales, desde tareas rápidas y sencillas hasta producciones complejas.
Para muchos creadores, esto es solo un martes normal. Los podcasters unen constantemente una introducción musical, el segmento principal de la entrevista y un mensaje de despedida. Así es como crean un episodio único y sin fisuras que está listo para sus oyentes. Sin él, solo tendrían una carpeta de clips inconexos.
Escenarios comunes en el mundo real
Las aplicaciones son increíblemente diversas y sorprendentemente prácticas. Piensa en estas situaciones comunes donde fusionar audio es innegociable:
- Producción musical: Los músicos y productores siempre están superponiendo pistas vocales, instrumentales y ritmos de acompañamiento para construir una canción completa.
- Edición de video: Los editores tienen que sincronizar diálogos de varios micrófonos o combinar efectos de sonido con una banda sonora de fondo para crear un paisaje sonoro inmersivo.
- Creación de contenido: Es posible que necesites combinar un puñado de notas de voz en un solo registro de audio o preparar una grabación larga para su transcripción.
- Proyectos personales: ¿Alguna vez has hecho una mezcla para hacer ejercicio o una lista de reproducción continua para una fiesta? Eso es simplemente unir tus canciones favoritas de principio a fin.
Esta habilidad es absolutamente central para los medios modernos. La explosión de la transmisión digital solo ha amplificado la demanda de audio perfectamente producido. De hecho, la transmisión por suscripción ahora representa más del 50% de los ingresos globales de música grabada. Los artistas fusionan innumerables tomas para crear las pistas finales que dominan estas plataformas.
La misma idea se aplica al audio para películas, videojuegos y anuncios, un mercado que ha crecido hasta los 650 millones de dólares. Puedes profundizar en más datos sobre el mercado global de la música para ver cómo estas tendencias dan forma a las necesidades de producción.
Conclusión clave: Aprender a fusionar archivos de audio no es solo una tarea técnica; es una habilidad fundamental para cualquiera que trabaje con sonido. Es lo que te permite crear contenido de calidad profesional para cualquier plataforma.
Preparando tus archivos para una fusión impecable
Un archivo de audio fusionado con un gran sonido no comienza cuando haces clic en "exportar". Comienza con el trabajo de preparación. Lo he visto una y otra vez: apresurar esta etapa es la causa número 1 de dolores de cabeza como cambios de volumen bruscos, errores de formato extraños y artefactos metálicos que simplemente arruinan el producto final.
Piénsalo como cocinar. No tirarías un montón de ingredientes aleatorios y sin preparar en una olla y esperar una comida gourmet. Lo mismo ocurre con el audio.
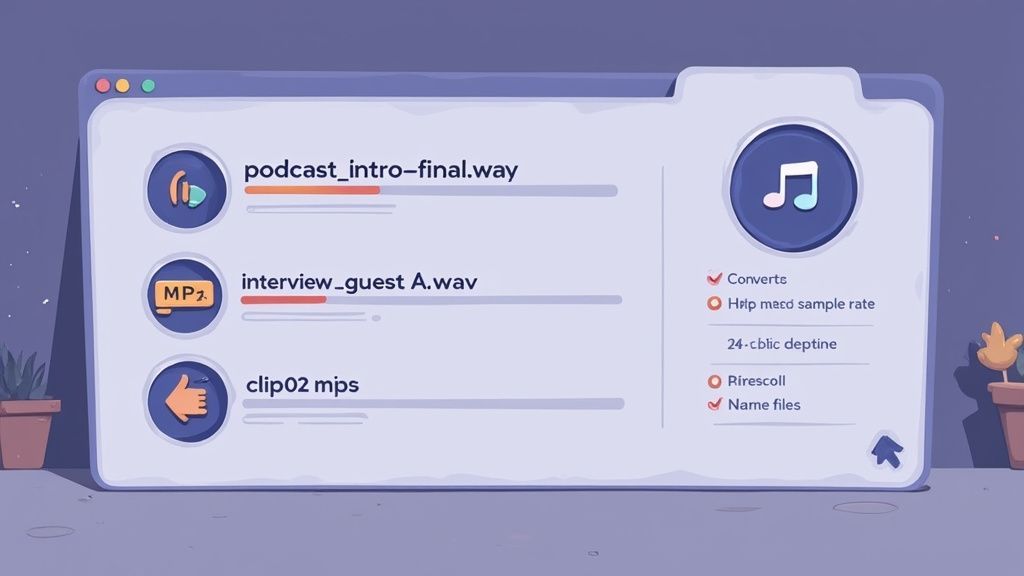
Estandariza las especificaciones de tu audio
Lo primero que absolutamente tienes que hacer es poner todos tus formatos de archivo en la misma página. Intentar fusionar un archivo WAV, un M4A y un MP3 directamente es pedir problemas. Algunos programas pueden manejarlo, pero dejas la calidad final al azar.
Un poco de trabajo de conversión por adelantado ahorra una gran cantidad de solución de problemas más adelante.
- Para calidad: Si la fidelidad del audio lo es todo, quédate con un formato sin comprimir como WAV. Conserva todos los datos de sonido originales, por lo que no pierdes nada.
- Para compatibilidad: Si necesitas un buen equilibrio entre calidad y tamaño de archivo manejable, opta por MP3 con una tasa de bits alta (como 320 kbps). Es el formato de trabajo por una razón.
Más allá del tipo de archivo, necesitas alinear las especificaciones técnicas. Asegúrate de que cada clip tenga la misma frecuencia de muestreo (por ejemplo, 44.1 kHz es estándar para música, 48 kHz para video) y profundidad de bits (por ejemplo, 16 bits o 24 bits). Si estos no coinciden, podrías encontrar que un clip se reproduce a la velocidad o tono incorrectos, un error clásico de principiante.
Para ayudarte a llevar un registro, aquí tienes una lista de verificación rápida para revisar antes de empezar a combinar nada.
Lista de verificación previa a la fusión de audio
Esta sencilla lista de verificación te ayudará a evitar los errores más comunes y garantizará que tus archivos de origen estén listos para una fusión fluida y de alta calidad.
| Verificación | Acción requerida | Por qué importa |
|---|---|---|
| Consistencia del formato de archivo | Convierte todos los clips a un solo formato (por ejemplo, WAV para calidad, MP3 para compatibilidad). | Previene errores de software, artefactos y pérdida de calidad impredecible durante la fusión. |
| Frecuencias de muestreo coincidentes | Asegúrate de que todos los archivos compartan la misma frecuencia de muestreo (por ejemplo, 44.1 kHz o 48 kHz). | Evita que los clips se reproduzcan a la velocidad o tono incorrectos. |
| Profundidad de bits consistente | Estandariza la profundidad de bits en todos los archivos (por ejemplo, 16 bits o 24 bits). | Garantiza una resolución de audio uniforme y previene posibles problemas de compatibilidad. |
| Convención de nombres lógica | Renombra los archivos en orden secuencial (por ejemplo, Parte_01_Introducción, Parte_02_Entrevista). | Facilita el ensamblaje de clips en el orden correcto sin adivinanzas. |
| Organización limpia de carpetas | Coloca todos los archivos de audio relacionados para un solo proyecto en su propia carpeta dedicada. | Ahorra tiempo y evita que uses accidentalmente el clip incorrecto. |
| Revisar y recortar el silencio | Escucha el principio y el final de cada clip, recortando cualquier silencio o aire muerto innecesario. | Crea un producto final más ajustado y de sonido profesional sin pausas incómodas. |
| Comprobación del nivel de volumen | Comprueba rápidamente los niveles de volumen de cada clip para identificar los que son significativamente más altos o más bajos. | Te ayuda a anticipar dónde necesitarás aplicar normalización o ajustes de volumen. |
Marcar estas casillas puede parecer trabajo extra, pero es la base de un resultado profesional y un flujo de trabajo mucho menos frustrante.
Recordatorio importante antes de fusionar
Antes de fusionar, verifica siempre que las especificaciones de tu audio coincidan. Incluso una pequeña discrepancia en la frecuencia de muestreo, la profundidad de bits o el códec puede causar cambios de tono inesperados o fallos de reproducción. Este simple paso de verificación previene el 90% de los problemas relacionados con la fusión.
Un proyecto limpio y organizado es un proyecto eficiente. Dedicar diez minutos a nombrar y ordenar correctamente tus archivos puede ahorrarte horas de frustración intentando encontrar el clip correcto o reordenando segmentos.
Organiza tus Archivos
Finalmente, hablemos de organización. Una carpeta llena de archivos con nombres como audio_final_new.wav y recording_2.mp3 es una receta para el caos. Créeme, te lo agradecerás más tarde si adoptas una convención de nomenclatura clara desde el principio.
Para un episodio de podcast, podría verse algo así:
Ep34_Intro_Music.wavEp34_Host_Intro.wavEp34_Interview_Main.wavEp34_Outro_CTA.wav
Esta estructura simple hace que el orden de fusión correcto sea instantáneamente obvio. Ya sea que estés montando un podcast o preparando una entrevista larga para nuestra guía sobre transcripción gratuita de audio a texto, este nivel de organización es innegociable para un proceso fluido.
Si quieres profundizar aún más, consultar una guía moderna para productores sobre cómo mezclar canciones puede ofrecer algunas ideas geniales sobre los principios más amplios del flujo de trabajo de audio.
Usando FFmpeg para una Potente Fusión por Línea de Comandos

Si valoras la velocidad, la automatización y el control total sobre tu audio, es hora de familiarizarte con FFmpeg. Olvídate de las interfaces gráficas con botones y líneas de tiempo; esta herramienta gratuita y de código abierto es una potencia de línea de comandos para procesar audio y video con una eficiencia increíble.
Claro, la terminal puede parecer un poco intimidante al principio, pero dominar algunos comandos clave puede transformar completamente tu flujo de trabajo.
Este método cambia las reglas del juego para desarrolladores, ingenieros de audio y cualquier persona que necesite procesar una gran cantidad de archivos en lote. Imagina que tienes 50 notas de voz separadas de una conferencia. Unirlas una por una en un editor visual llevaría una eternidad. Con FFmpeg, puedes escribir un script simple y fusionarlas todas en cuestión de segundos.
El Comando Básico de Concatenación
Comencemos con el escenario más común: unir algunos archivos que ya están en el mismo formato y usan el mismo códec (como un puñado de MP3). Esta es la forma más sencilla de hacer el trabajo.
El proceso implica crear un archivo de texto básico que enumere todos los clips que deseas unir, en el orden exacto en que los necesitas.
- Primero, crea un nuevo archivo de texto y llámalo
mylist.txt. - Dentro, enumera tus archivos de audio con la palabra clave
file, uno por línea, así:file 'Part_01_Intro.mp3'file 'Part_02_Interview.mp3'file 'Part_03_Outro.mp3' - Asegúrate de guardar este archivo de texto en el mismo directorio que tus clips de audio.
Ahora, abre tu terminal o símbolo del sistema, navega hasta esa carpeta y ejecuta este comando:
ffmpeg -f concat -i mylist.txt -c copy Merged_Output.mp3
Este comando le dice a FFmpeg que concatene (o una) los archivos listados en mylist.txt. Luego, copia sus flujos de audio a un nuevo archivo llamado Merged_Output.mp3. Esa parte -c copy es la salsa secreta: reempaqueta los datos de audio sin volver a codificarlos. Esto no solo es increíblemente rápido, sino que también preserva el 100% de la calidad original.
Manejo de Archivos con Diferentes Formatos
Entonces, ¿qué sucede si tus archivos son una mezcla heterogénea, uno es WAV y otro es M4A? El método de concatenación simple no funcionará porque sus estructuras de datos subyacentes son completamente diferentes.
Aquí es donde el sistema de filtros de FFmpeg realmente brilla. Usarás el filtro concat para volver a codificar los archivos sobre la marcha, haciéndolos compatibles antes de unirlos.
El comando es un poco más complejo, pero es igual de potente.
ffmpeg -i Part_01_Intro.wav -i Part_02_Interview.m4a -filter_complex "[0:a][1:a]concat=n=2:v=0:a=1[a]" -map "[a]" Merged_Output.mp3
Analicemos rápidamente lo que está sucediendo aquí:
-i Part_01_Intro.wav -i Part_02_Interview.m4a: Estos son tus dos archivos de entrada.-filter_complex: Esta bandera le dice a FFmpeg que estás a punto de hacer algo más avanzado.[0:a][1:a]concat=n=2:v=0:a=1[a]: Este es el núcleo de la operación. Toma el flujo de audio de la primera entrada[0:a]y la segunda entrada[1:a], los concatena (concat=n=2significa dos entradas) y especifica que no hay video (v=0) y una salida de audio (a=1). El resultado recibe una etiqueta temporal de[a].-map "[a]": Esto simplemente mapea ese flujo de audio etiquetado[a]al archivo de salida final.
Súper Consejo: Para tareas repetitivas, puedes encapsular estos comandos de FFmpeg dentro de un script de shell. Esto te permite fusionar cientos de archivos con un solo comando, ahorrando una gran cantidad de tiempo.
Este enfoque es perfecto para construir un flujo de trabajo automatizado, como un proceso del lado del servidor que combina fragmentos de audio subidos por los usuarios en un archivo único y cohesivo.
Formas prácticas en que las personas utilizan la fusión de audio
Ensamblaje de episodios de podcast
Fusiona música de introducción, entrevistas, anuncios y finales en un solo archivo de episodio limpio. Perfecto para creadores que desean un flujo de trabajo de publicación optimizado.
Compilación de conferencias y reuniones
Combina grabaciones multipartes, notas de voz o sesiones de clase en un solo archivo de referencia continuo para facilitar el estudio o la transcripción.
Producción de música y ritmos
Los productores fusionan frecuentemente capas de pistas, tomas vocales o segmentos de ritmos para prototipar canciones y finalizar mezclas.
Reutilización de contenido
Crea un activo de audio fusionado que puedas introducir en herramientas de transcripción para generar blogs, resúmenes, citas y clips para redes sociales.
Fusionando Audio Visualmente con Audacity
Si escribir comandos te parece un poco abstracto, es hora de conocer Audacity. Para cualquiera que prefiera una forma más práctica y visual de trabajar con audio, es la herramienta perfecta. Es completamente gratuita, potente y presenta todo en una línea de tiempo para que puedas ver literalmente tus ondas sonoras.
Este enfoque visual es un salvavidas para proyectos que necesitan un toque humano, como editar una entrevista de podcast. Puedes identificar exactamente dónde termina un hablante y comienza otro, lo que te permite hacer cortes súper limpios y precisos. Esa capacidad de hacer zoom y mover clips te da un nivel de control que las herramientas de línea de comandos simplemente no pueden ofrecer.
Es fácil olvidar que antes de software como Audacity, fusionar audio significaba cortar y empalmar físicamente cinta magnética con una cuchilla. Cuando llegaron las Estaciones de Trabajo de Audio Digital (DAW) a finales de los 90 —el propio Audacity se lanzó en 2000— cambiaron completamente el juego. Para 2005, este enfoque de software se convirtió en el estándar, convirtiendo trabajos de edición que llevaban días en algo que podías hacer en minutos. Puedes obtener más información sobre la evolución del mercado de audio en mordorintelligence.com.
Introduciendo tus Clips en Audacity
Primero lo primero, necesitas introducir tus archivos de audio en el programa. La buena noticia es que no tienes que importarlos uno por uno.
Simplemente selecciona todos tus archivos de audio en la carpeta de tu computadora y arrástralos directamente a la línea de tiempo de Audacity. Cada archivo aparecerá en su propia pista separada, apilados uno encima del otro. Este es tu punto de partida.
Esta vista multipista es exactamente lo que quieres. Mantiene cada clip separado, permitiéndote ajustar cada uno antes de unirlos todos.
Organizando y Alineando tus Pistas
Ahora que tus clips están cargados, el objetivo es alinearlos uno tras otro en una sola pista. Aquí es donde la Herramienta de Desplazamiento Temporal de Audacity es tu mejor aliada; busca el icono con una flecha de dos puntas <->.
Una vez que hayas seleccionado la Herramienta de Desplazamiento Temporal, puedes hacer clic en cualquier clip de audio y simplemente arrastrarlo hacia la izquierda o hacia la derecha. Desliza tu segundo clip hasta que su inicio se acople perfectamente al final del primero. Haz esto con todos tus clips hasta que formen un bloque de audio largo y continuo.
Consejo Profesional: Para que la alineación sea absolutamente perfecta, utiliza la herramienta de zoom para obtener una vista ampliada donde se unen dos clips. Esto te permite ver las formas de onda en detalle y asegura que no dejes pequeños silencios o crees un solapamiento incómodo.
Pulido de tu Audio Fusionado
Tus archivos pueden estar en el orden correcto, pero una fusión en bruto a menudo puede sonar torpe y poco profesional. Unos pocos pasos adicionales pueden marcar una gran diferencia.
- Crear Transiciones Suaves: Para evitar cortes bruscos, puedes crear un fundido cruzado. Arrastra el inicio de un clip para que se solape ligeramente con el final del anterior. Resalta esa pequeña sección superpuesta y ve a
Efecto > Fundido cruzado de pistas. Esto desvanecerá suavemente un clip mientras el siguiente aparece gradualmente. - Normalizar Niveles de Volumen: Si una de tus grabaciones es mucho más alta que las otras, será muy notorio. Selecciona todo (Ctrl+A en Windows, Cmd+A en Mac), luego navega a
Efecto > Normalización de volumen. Esto ajusta automáticamente todos los clips a un volumen consistente y equilibrado. - Recortar Silencio Excesivo: Utiliza la Herramienta de Selección para resaltar cualquier silencio al principio o al final de tu pista combinada. Una pulsación rápida de la tecla de borrar lo elimina, dándote un producto final mucho más limpio.
Una vez que estés satisfecho con cómo suena todo, es hora de exportar. Ve a Archivo > Exportar y elige tu formato; MP3 o WAV son los más comunes. Audacity luego mezclará todo en un único archivo de audio unificado, listo para usar.

Detección de hablantes
Identifica automáticamente diferentes hablantes en tus grabaciones y etiquétalos con sus nombres.
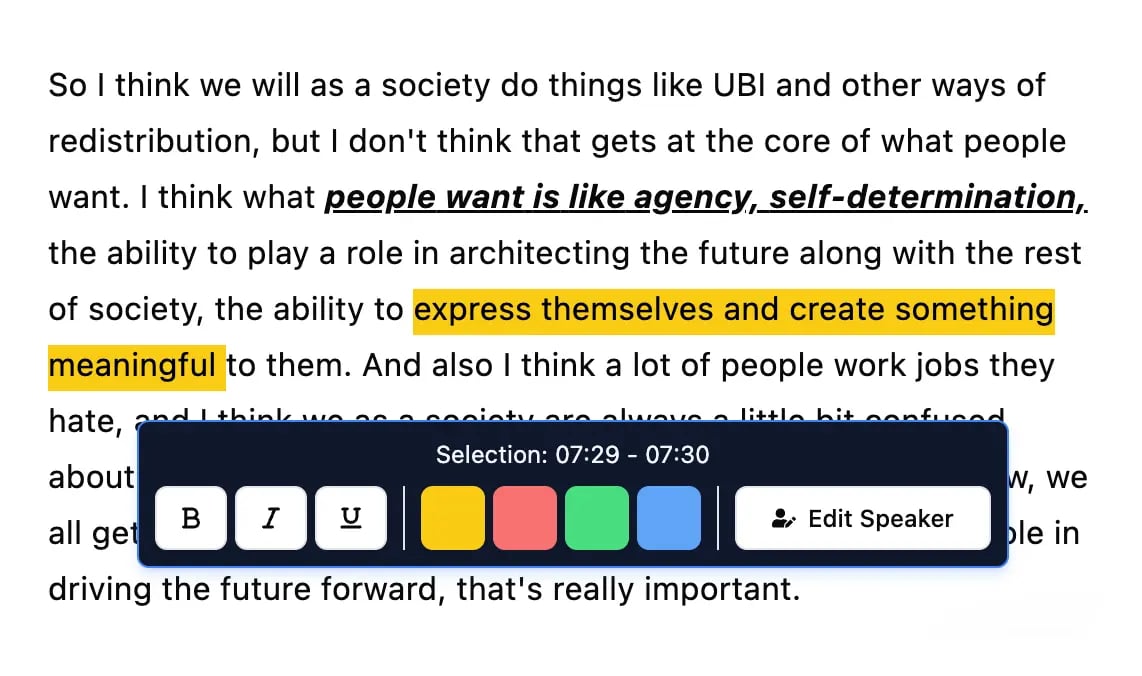
Herramientas de edición
Edita transcripciones con herramientas potentes como buscar y reemplazar, asignación de hablantes, formatos de texto enriquecido y resaltado.
Resúmenes y Chatbot
Genera resúmenes y otros análisis de tu transcripción, prompts personalizados reutilizables y chatbot para tu contenido.
Fusiones Rápidas con Herramientas en Línea y Aplicaciones Móviles
A veces no necesitas la potencia de una aplicación de escritorio completa. Cuando solo necesitas combinar algunos archivos rápidamente sin instalar ningún software, las herramientas basadas en navegador y las aplicaciones móviles son tu mejor opción. Están diseñadas para la velocidad y la conveniencia, lo que las hace perfectas para tareas simples y sobre la marcha.
Digamos que acabas de terminar una serie de entrevistas a clientes grabadas como notas de voz en tu teléfono. Quieres fusionarlas en un solo archivo para tus registros antes de siquiera regresar a la oficina. Aquí es exactamente donde estas ágiles herramientas brillan.
Eligiendo el Unidor de Audio en Línea Adecuado
Herramientas basadas en navegador como Audio Joiner y Clideo te permiten subir tus archivos, arrastrarlos en orden y descargar el resultado fusionado en minutos. Suena genial, pero es importante ser consciente de sus limitaciones y, lo que es más importante, de sus políticas de privacidad.
Debido a que estás subiendo tus datos a un servidor de terceros, estas herramientas no son la opción adecuada para grabaciones sensibles o confidenciales.
Siempre verifica algunas cosas antes de subir:
- Límites de Tamaño de Archivo: Muchas herramientas gratuitas ponen un límite al tamaño o al número de archivos que puedes subir a la vez.
- Política de Privacidad: Tómate un momento para comprender cómo se almacenan tus datos y por cuánto tiempo. Las buenas eliminan automáticamente tus archivos después de unas horas.
- Opciones de Exportación: Asegúrate de que la herramienta pueda exportar en el formato que necesitas (MP3 es casi siempre una opción) sin colocar una marca de agua molesta en tu audio.
La conclusión clave aquí es que los unidores en línea están diseñados para la velocidad, no para la seguridad de alto nivel o las funciones avanzadas. Son fantásticos para proyectos no sensibles donde la conveniencia es la prioridad número uno.
Para una mirada más profunda a un tema relacionado, consulta nuestra guía sobre las mejores herramientas de conversión de audio a texto, ya que muchas de ellas también funcionan directamente en tu navegador.
La infografía a continuación puede ayudarte a visualizar el flujo de trabajo cuando utilizas una herramienta más práctica como Audacity para tu fusión.
Como muestra la guía, tu primer paso es decidir si necesitas reorganizar clips, lo que te lleva a la Herramienta de Desplazamiento Temporal (Time Shift Tool), o si solo necesitas crear una transición suave usando el efecto de Fundido Cruzado (Crossfade).
Mejores Aplicaciones Móviles para Fusionar al Instante
Las aplicaciones móviles llevan la edición de audio directamente a tu bolsillo, un salvavidas para los creadores que están siempre en movimiento. Puedes importar fácilmente archivos desde el almacenamiento de tu teléfono o un servicio en la nube, unirlos y exportar una pista final que esté lista para redes sociales o para compartir con tu equipo.
- En iOS: Aplicaciones como Hokusai Audio Editor o incluso el propio GarageBand de Apple ofrecen edición multipista sorprendentemente potente. Puedes importar clips, recortarlos y organizarlos en una línea de tiempo, de manera muy similar a como lo harías en un escritorio.
- En Android: AudioLab y WaveEditor son dos opciones populares que te brindan sólidas capacidades de fusión junto con otras herramientas útiles como recorte y conversión de formato.
El proceso suele ser bastante sencillo: importa tus clips de audio a la línea de tiempo de la aplicación, organízalos en el orden correcto con un simple arrastrar y soltar, y luego exporta todo el proyecto como un solo archivo MP3 o M4A. Estas aplicaciones son perfectas para crear collages de audio rápidos, unir segmentos de podcasts o simplemente combinar algunas notas de voz.
Comparación de Métodos de Fusión de Audio
Elegir la herramienta adecuada puede ser abrumador, así que he preparado una comparación rápida para ayudarte a decidir qué método se adapta mejor a tus necesidades. Esta tabla desglosa las fortalezas y debilidades de cada enfoque que hemos discutido.
| Método | Mejor Para | Pros | Contras |
|---|---|---|---|
| FFmpeg | Procesamiento por lotes, automatización y desarrolladores cómodos con la línea de comandos. | Extremadamente potente, rápido y scriptable. Maneja prácticamente cualquier formato. | Curva de aprendizaje pronunciada; sin interfaz visual. |
| Audacity | Edición detallada, fundidos cruzados y control visual sobre la mezcla final. | Gratuito, de código abierto y rico en funciones. Ofrece control preciso de la línea de tiempo. | Puede ser excesivo para fusiones simples; el proceso manual no es rápido. |
| Herramientas en Línea | Fusiones rápidas y simples de archivos no sensibles sin instalación de software. | Muy fácil de usar, rápido y accesible desde cualquier navegador. | Preocupaciones de privacidad, límites de tamaño/número de archivos, requiere internet. |
| Aplicaciones Móviles | Edición y fusión sobre la marcha directamente desde tu teléfono. | Altamente conveniente para grabaciones de campo, notas de voz y contenido de redes sociales. | Funciones limitadas en comparación con el escritorio; la pantalla pequeña puede ser complicada. |
En última instancia, no existe una única herramienta "mejor", todo depende de lo que intentes lograr. Para una fusión rápida y sencilla, una herramienta en línea es fantástica. Para un episodio de podcast pulido, querrás el control que ofrece Audacity. Y para flujos de trabajo automatizados, nada supera a FFmpeg.
Convierte Tu Audio Fusionado en Contenido Accionable
Tu archivo de audio perfectamente fusionado no es la línea de meta, es el bloque de salida. El valor real se desbloquea cuando transformas esa pista única y cohesiva en contenido que puedes usar. Sin este paso final, tu audio pulido sigue siendo solo un archivo de sonido, encerrado.
Transcribir manualmente una grabación larga, como un episodio de podcast completo o una entrevista de varias partes, consume mucho tiempo. He estado allí. Es tedioso. Aquí es donde las herramientas impulsadas por IA cambian completamente tu flujo de trabajo, convirtiendo una tarea de días en cuestión de minutos.
De Archivo de Audio a Motor de Contenido
El proceso es sorprendentemente sencillo. Una vez que tu audio esté fusionado, simplemente sube el archivo final a un servicio de transcripción como Transcript.LOL. La IA se pone a trabajar, generando una transcripción de alta precisión con marcas de tiempo y etiquetas de hablante.
Pero esto es mucho más que solo poner las palabras por escrito.
Esta transcripción se convierte en la materia prima para un potente motor de contenido. Es la base sobre la cual puedes construir una biblioteca completa de activos, maximizando el alcance y el impacto de tu grabación original.
Con una transcripción detallada en mano, se abren un montón de nuevas posibilidades. De repente, tienes una mina de oro de material con el que trabajar.
- Crea Notas del Programa Instantáneas: Simplemente extrae los temas clave y las marcas de tiempo directamente de la transcripción para tus oyentes de podcast. Hecho.
- Genera Publicaciones de Blog: Puedes adaptar fácilmente el diálogo de tu audio a un artículo bien estructurado, ahorrando horas de tiempo de escritura.
- Elabora Contenido para Redes Sociales: Identifica las citas más convincentes y conviértelas en gráficos llamativos para Instagram, X o LinkedIn.
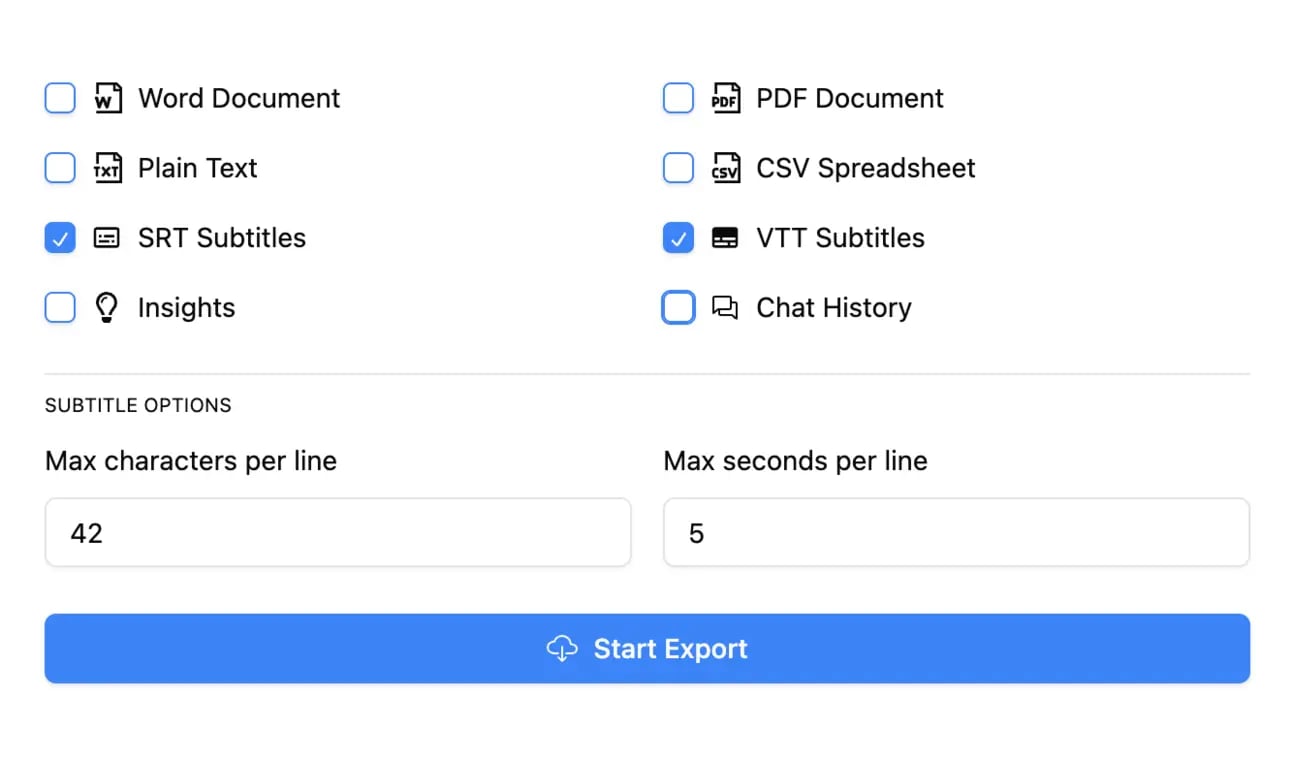
- Produce Subtítulos para Videos: Exporta la transcripción como un archivo SRT o VTT para hacer que tu contenido de video sea más accesible y atractivo para todos.
A medida que te adentras más en la producción de audio, encontrarás otras formas de refinar tu proceso. Explorar técnicas avanzadas como aprovechar la entrada de voz como herramienta de productividad puede potenciar aún más tu flujo de trabajo.
Al adoptar estos métodos, conviertes un archivo de audio fusionado en docenas de piezas de contenido. Para más ideas sobre esto, consulta nuestra guía sobre estrategias efectivas de reutilización de contenido.
¿Tienes Preguntas Sobre la Fusión de Audio?
Incluso con las mejores herramientas, es probable que te encuentres con algunos obstáculos al combinar audio. Le sucede a todo el mundo. Vamos a repasar algunos de los dolores de cabeza más comunes que la gente se encuentra y cómo resolverlos.
Una de las primeras cosas que preocupan a la gente es la calidad. Si fusionas un montón de archivos WAV de alta calidad en un solo MP3, ¿estás arruinando el sonido? La respuesta corta es sí, siempre hay alguna pérdida de datos cuando creas un archivo comprimido como un MP3.
Pero aquí está la cosa: si lo haces bien, la diferencia es prácticamente imposible de escuchar. Cuando exportes tu pista fusionada final, asegúrate de usar una tasa de bits alta; 320 kbps es el estándar de oro. Para la persona promedio, sonará perfecto. Solo recuerda conservar tus archivos originales sin comprimir, por si acaso.
Una vez que tu audio esté fusionado, no lo dejes sin usar. Conviértelo en transcripciones, resúmenes, notas y contenido al instante. Usa Transcript.LOL para convertir tu archivo fusionado final en información procesable en cuestión de minutos.
Solucionando esos molestos puntos de fricción
De acuerdo, ¿qué pasa con el volumen desigual? Este es un clásico. Tienes una nota de voz silenciosa justo al lado de la introducción de un podcast ruidoso, y el resultado final es un desastre discordante. No tienes que volver atrás y ajustar cada clip manualmente.
Esto es exactamente para lo que se creó la normalización. Editores de audio como Audacity tienen una herramienta de "Normalización de volumen" o "Normalizar" integrada. Simplemente aplícala a todos tus clips antes de exportar, y el software llevará automáticamente todo a un nivel consistente y equilibrado.
Consejo profesional: La normalización no se trata de subir todo al volumen máximo. Se trata de lograr un volumen percibido uniforme para que un clip no te reviente los tímpanos mientras que el siguiente es apenas un susurro. Esto es clave para un resultado de sonido profesional.
Aquí hay algunas otras preguntas rápidas que escuchamos todo el tiempo:
- ¿Puedo fusionar más de dos archivos? Por supuesto. A herramientas como Audacity y FFmpeg realmente no les importa si les das dos archivos o doscientos. Sin embargo, si estás tratando con un lote masivo, es mucho más rápido hacerlo con un script usando FFmpeg.
- ¿Qué pasa si mis archivos son todos de formatos diferentes? Problema súper común. La solución más fácil es convertir todo a un formato único y consistente (como WAV) antes de empezar a fusionar. Ese único paso de preparación te salvará de un mundo de errores extraños.
- ¿Hay un límite en la duración del archivo final? Técnicamente no, pero la practicidad es un factor. Un solo archivo de audio de diez horas es una pesadilla para gestionar, editar o incluso subir. Si has fusionado una grabación de un seminario enorme, el siguiente paso es transcribirla. Nuestra guía sobre cómo transcribir archivos de audio explica cómo manejar esos archivos masivos de manera eficiente.
Una vez que tengas tu archivo de audio final y fusionado, comienza el verdadero trabajo. Transcript.LOL puede tomar ese archivo y transcribirlo instantáneamente, completo con etiquetas de hablante y marcas de tiempo. Esto hace que sea increíblemente fácil crear notas del programa, extraer citas para redes sociales o escribir una publicación de blog completa. Obtén tu primera transcripción gratis en https://transcript.lol.