How to Add Closed Captioning to a Video A Practical Guide
Learn how to add closed captioning to a video with this practical guide. We cover AI tools, manual methods, and platform-specific tips for accessibility.
Praveen
June 25, 2025
So, you need to add captions to your video. You've basically got three ways to tackle it: let an AI-powered tool do the heavy lifting, manually type and sync everything yourself for ultimate control, or use the built-in features on platforms like YouTube.
Honestly, the AI route is the fastest. You can get a complete caption file (like an SRT or VTT) ready to go in just a few minutes.
Why Your Videos Need Closed Captions Now
Learning how to add closed captions to a video has gone from a niche accessibility task to a flat-out essential part of any modern marketing strategy. This isn't just a "nice-to-have" anymore—it's driven by viewer habits, search engine demands, and even legal standards. If your videos aren't captioned, you're leaving a massive audience on the table.
Captions Impact More Than Accessibility
Closed captions improve engagement, expand reach, and increase watch time across platforms. They also help viewers understand content faster, especially in sound-off environments, making captions a performance and UX upgrade—not just an accessibility feature.
First, let's clear something up. What exactly are closed captions? Unlike open captions, which are permanently burned into the video, closed captions (CC) can be toggled on or off. That little bit of control makes a huge difference for the viewer.
Boost User Experience and Engagement
Think about where you watch videos. On the train? In a coffee shop? Scrolling through social media in a quiet office? A huge chunk of video content is consumed with the sound off. Without captions, your message is completely lost.
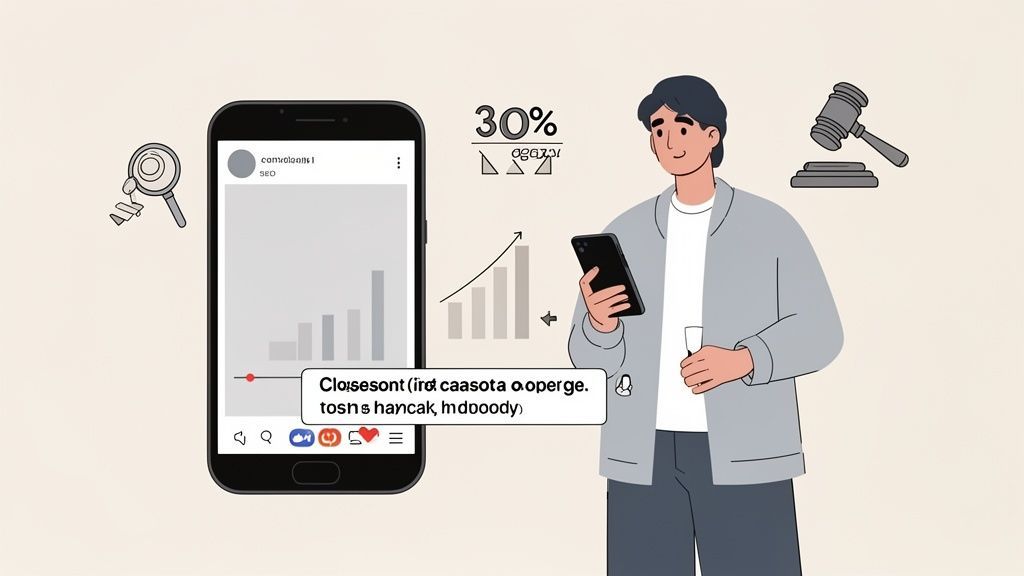
I’ve seen marketing teams get a 30% jump in ad engagement just by adding captions. It’s that simple. Their message lands even when people are watching in a silent environment, which means better ad performance and a much healthier ROI.
Supercharge Your Video SEO
Here’s a fact many people miss: Google can’t watch your video. But it can crawl text. When you add a caption file, you’re basically handing Google a perfect, word-for-word transcript of your entire video.
Suddenly, your video becomes indexable and searchable. A tutorial on "baking sourdough bread" is far more likely to rank if the transcript is packed with those keywords and related phrases. You’re turning your video from a black box into a text-based asset that pulls in organic traffic. We dive deeper into how this works in our guide on using speech-to-text for video.
Key Takeaway: Adding captions is one of the most effective SEO moves you can make for your videos. It lets search engines actually understand and rank your content, massively boosting its discoverability.
State-of-the-art AI
Powered by OpenAI's Whisper for industry-leading accuracy. Support for custom vocabularies, up to 10 hours long files, and ultra fast results.

Speaker detection
Automatically identify different speakers in your recordings and label them with their names.
Summaries and Chatbot
Generate summaries & other insights from your transcript, reusable custom prompts and chatbot for your content.
Meet Critical Legal and Accessibility Standards
Beyond the marketing wins, captioning is a legal and ethical must-do. Laws like the Americans with Disabilities Act (ADA) require digital content to be accessible, and that includes providing captions for people who are deaf or hard of hearing.
This is no longer a fringe issue; it's a mainstream requirement. The global closed captioning market is expected to hit USD 9.7 billion by 2025, which shows you just how seriously companies are taking this. It’s not just about compliance—it’s about inclusivity.
Before you even think about the nitty-gritty of adding closed captions, you’ve got a big decision to make. It’s a fork in the road that defines your entire process: do you go with a lightning-fast automated workflow or the meticulous, hands-on approach of manual captioning?
There’s no single "best" answer here. The right choice really comes down to your content, your deadline, and how precise you need to be. Each path has its own set of trade-offs.
The Case for Automated Captioning
Let's be honest, speed is the name of the game for most creators today. Automated captioning, powered by AI tools like Transcript.LOL, is all about efficiency. It turns a task that used to eat up hours into something you can knock out in minutes.
You just upload your video, and the software spits out a time-stamped transcript almost instantly.

Import from multiple sources
Import audio and video files from various sources including direct upload, Google Drive, Dropbox, URLs, Zoom, and more.
Editing tools
Edit transcripts with powerful tools including find & replace, speaker assignment, rich text formats, and highlighting.
Export in multiple formats
Export your transcripts in multiple formats including TXT, DOCX, PDF, SRT, and VTT with customizable formatting options.
This is a lifesaver for anyone creating content at scale. Think podcasters with weekly episodes, marketers juggling dozens of ad variations, or educators prepping online courses. It’s also way cheaper than hiring a human. For most projects, modern AI can hit up to 95% accuracy, which is more than good enough.
Here’s a real-world scenario: you've got a one-hour webinar recording that needs to go live by the end of the day.
- Speed: An AI tool can get the whole thing transcribed in less than five minutes.
- Efficiency: It can even identify different speakers automatically, which saves a ton of tedious work.
- Cost: It’s a fraction of what you’d pay for manual transcription.
Once the AI does its thing, you can jump into an interactive editor to quickly fix any minor slip-ups, like specialized jargon or misspelled names. This blend of AI speed and human review is the perfect workflow for the vast majority of modern video projects.
When Manual Captioning Is the Right Choice
While automation is incredible, it’s not a silver bullet. Manual captioning is still the gold standard when you absolutely cannot afford a mistake. This is the old-school process where a real person listens to the audio and carefully types out every single word, sound, and speaker change.
When does this make sense? It's non-negotiable for content where a tiny error could have huge consequences. Legal depositions, medical training videos, or dense scientific presentations demand 100% accuracy. You can’t risk an AI mishearing a critical term.
Artistic projects like films and documentaries also benefit from that human touch. A person can capture the emotional tone, note meaningful pauses, and describe key sound effects—like [tense music swells]—that an algorithm would almost certainly miss. It’s slow and it costs more, no doubt, but that investment guarantees a flawless result.
Expert Insight: The choice isn't just about accuracy; it's about context. For a quick Instagram Reel, 95% AI accuracy is perfect. For a legal proceeding being entered into evidence, only human-verified 100% accuracy will do.
Automated vs. Manual Captioning: Which Is Right for You?
So, how do you decide? It helps to weigh your project against a few key factors. There isn't a one-size-fits-all solution, but this quick comparison should point you in the right direction.
Choosing the Right Captioning Approach
Speed vs Precision
AI captioning delivers results in minutes, while manual captioning ensures near-perfect accuracy. Your deadline often determines the right choice.
Content Sensitivity
Marketing videos tolerate minor errors, but legal, medical, or compliance content demands human-verified captions.
Budget Considerations
AI tools drastically reduce captioning costs at scale, making them ideal for creators producing frequent video content.
Scalability Needs
If you publish weekly or daily videos, automation is the only sustainable way to maintain consistency and accessibility.
| Factor | Automated Captioning (e.g., Transcript.LOL) | Manual Captioning |
|---|---|---|
| Turnaround | Perfect for urgent projects (minutes/hours) | Works for flexible deadlines (days) |
| Budget | Great for cost-sensitive projects | Best when quality is the top priority |
| Content Type | Social media, marketing, online courses | Legal, medical, or artistic films |
| Accuracy | "Good enough" is acceptable (~95%) | Absolute precision is required (99%+) |
A lot of creators I know have landed on a hybrid approach that offers the best of both worlds: use AI for the initial heavy lifting, then do a thorough manual review to catch any mistakes.
To see what's out there, you can explore some of the best AI transcription software that make this blended workflow super easy to manage.
Using AI to Generate Captions in Minutes
Let's be real: manual captioning is a grind. It has its place for highly specialized work, but for the rest of us, automation is the only sane way forward. Using an AI tool like Transcript.LOL takes the multi-hour chore of captioning and shrinks it down to a few minutes—about the time it takes to make a coffee.
This isn't just about saving time. It's about making professional, accessible captions a realistic goal for everyone, not just big production houses. The whole process is incredibly simple: give it your video, let the AI do the heavy lifting, and then spend a few moments polishing the result in an interactive editor. No more technical headaches or outrageous costs.
Getting Your Video Ready for Transcription
First things first, you have to get your video into the system. Modern tools have made this part ridiculously flexible. Forget wrestling with file converters or worrying about storage space.
With a platform like Transcript.LOL, you've got options. You can upload a video file straight from your computer—perfect for content you just finished editing. Or, even easier, just paste a link from YouTube or Vimeo. The AI grabs the video and gets to work without you having to download a thing.
For anyone working in a team, the cloud integrations are a lifesaver.
- Google Drive & Dropbox: Just connect your account to pull videos directly from your shared team folders.
- Zoom Recordings: Link your Zoom account, and your meetings and webinars can be transcribed automatically as soon as they end.
- API Integrations: For the developers out there, APIs let you build custom workflows to send videos for transcription automatically.
This is exactly why the industry is moving so fast. Cloud-based AI tools have completely taken over. The global market for captioning solutions is expected to hit around USD 534.47 million by 2031, and cloud-based systems are projected to make up 65.5% of that market by 2035. The growth is all about this newfound ease—upload a long video, get a transcript in seconds, and export your caption file.
Letting the AI Do the Hard Work
Once your video is in, the magic starts. Powerful AI models, like OpenAI's Whisper, analyze the audio track and spit out a complete, time-stamped transcript in minutes.
Captioning Tools Now Handle Timing Automatically
Modern AI transcription tools automatically generate precise word-level timestamps, removing the most complex and error-prone part of caption creation.
But it’s so much more than a block of text. The AI is smart enough to handle a few key jobs at once:
- Speaker Detection: It automatically figures out when different people are talking and labels them ("Speaker 1," "Speaker 2"). This saves an unbelievable amount of time on interviews or panel discussions.
- Accurate Timestamps: Every single word is synced perfectly to the video's timeline, which is the secret sauce for creating spot-on SRT or VTT files.
- Punctuation and Formatting: The AI adds periods, commas, and question marks where they belong, giving you a clean, readable document from the get-go.
This workflow diagram really puts it into perspective. You can see just how much of the tedious work gets automated.

The AI handles the two most painful parts—transcribing and timing—leaving you with the much quicker job of a final review.
A Quick Polish for Perfect Accuracy
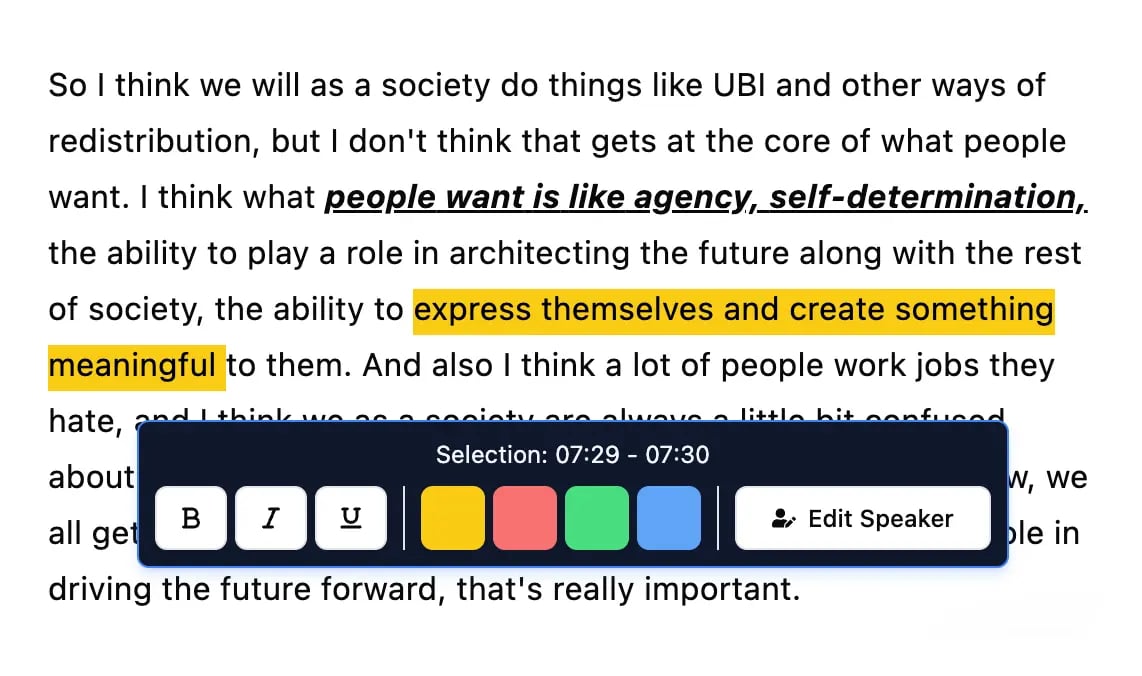
No AI is flawless, but today's tools get you incredibly close, often hitting up to 99% accuracy. Your job is to handle that final 1%. An interactive editor makes this process fast and almost fun.
Pro Tip: Play the video back at 1.5x or 2x speed while you read along with the transcript. Your brain is surprisingly good at catching errors when you hear and read at the same time. This trick can easily cut your review time in half.
As the video plays, the editor highlights the corresponding text, so you never lose your place. You can click any word to instantly jump to that point in the video.
Here are the most common tweaks you’ll probably make:
- Fixing Proper Nouns: AI can stumble on unique names, brands, or internal jargon. A quick find-and-replace takes care of this across the entire transcript.
- Adjusting Speaker Labels: If the AI assigned "Speaker 1," you can easily change it to "Jane Doe" for clarity.
- Tweaking Punctuation: You might want to break up a long sentence or add a comma to improve flow. The editor works just like any word processor.
A lot of modern AI video editing software now includes automated captioning features right inside the editing suite, which is another great way to streamline your workflow.
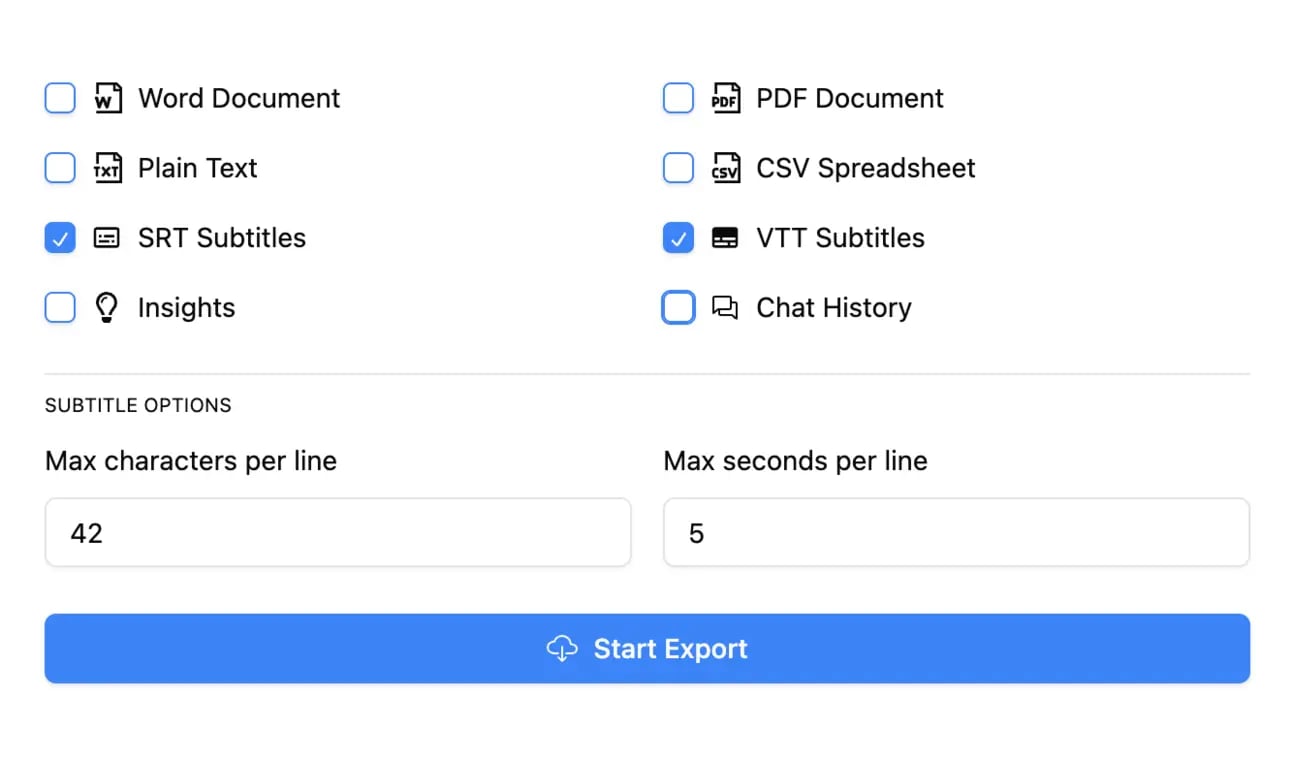
Once you’re happy with the text, you just export it. You’ll get the SRT and VTT files you need for closed captioning, along with other formats. For a typical 5-minute video, this whole process—upload, transcribe, edit, export—can be done in under 10 minutes. It's a testament to how far this technology has come.
If you want to dive deeper into the transcription part of this, check out our guide on how to transcribe audio.
Getting Your Captions onto Your Video Platforms
Alright, you've done the hard part. The AI transcription did its thing, you've polished the text, and now you have a perfectly synced SRT or VTT file sitting on your computer. But a caption file doesn’t do much good on its own.
The final step is pairing it with your video so your audience can actually see it. This is where the path splits into two, depending on where your video will live.
Big video platforms like YouTube and Vimeo have built-in systems for what we call "soft captions"—the kind viewers can toggle on and off. Social media, on the other hand, usually demands "burned-in captions" that are permanently stamped onto the video.
Uploading Soft Captions to YouTube and Vimeo
Let's tackle the most common scenario for content creators: adding captions to a dedicated video host. Both YouTube and Vimeo make this incredibly simple. You just upload your caption file, and the platform handles the rest.
On YouTube, it's just a few clicks:
- Head into your YouTube Studio and find the video you want to caption.
- Click the Subtitles tab on the left-hand menu.
- Select Add Language and choose the language of your captions.
- Under the "Subtitles" column, click Add and upload your file. That's it.
Vimeo's workflow is almost identical. Once you're on your video's settings page, find the "Captions and audio" section and upload your SRT or VTT file there. The platform will process it and add that familiar "CC" button to your video player.
Why this matters: Using soft captions on platforms like YouTube and Vimeo is the gold standard for accessibility. It gives viewers control and lets you add multiple language tracks to the same video, opening up your content to a global audience.
The best part about this method is the flexibility. Spot a typo a week later? Just upload a corrected version of the caption file. No need to re-render and re-upload your entire video. For a deep dive into creating these files, our guide on how to create SRT files has you covered.
Understanding Burned-In Captions for Social Media
Now for the wild world of social media. Platforms like Instagram, TikTok, and LinkedIn are a different beast entirely. Most of them don’t support separate SRT or VTT uploads for regular video posts.
This is where burned-in captions (or open captions) are non-negotiable.
Burned-in captions are text rendered permanently into the video frames, just like a title card or a logo. They can't be turned off, which is actually a huge advantage when you remember that over 85% of social media videos are watched with the sound off.
You're guaranteeing your message gets across, no matter what.
This approach does require an extra step in your video editing software. You can't just upload a file; you have to import your transcript and "burn" it onto the video before you export the final MP4.
A Quick Guide to Burning In Captions
Whether you’re using professional software like Adobe Premiere Pro or a free tool like CapCut, the general process is the same. It’s all about importing your caption file, styling it to fit your brand, and exporting the final video.
Let's use Adobe Premiere Pro as an example:
- Import Your Captions: In your project, go to
File > Importand select your SRT file. Drag it onto your timeline, placing it on a track above your video clip. - Style the Text: Click the caption track on your timeline to open the Essential Graphics panel. This is where the magic happens—you can change the font, size, color, background, and position to make sure the text is crisp, clear, and on-brand.
- Export the Video: When you’re ready to export, head to your export settings. Find the "Captions" tab and make sure you select "Burn Captions Into Video." This tells Premiere to permanently merge the text with the video frames.
This process ensures your captions show up everywhere, on every device, because they are literally part of the video itself. It's the most reliable way to make your content accessible and engaging for every single person scrolling through their feed.
Crafting High-Quality and Accessible Captions
Simply dropping a caption file onto your video isn't the finish line. It's the start. The real goal is to create captions that are genuinely helpful, easy to read, and fully accessible. This is the difference between just checking a box and actually making a real impact on your audience's experience.
Let’s get past the technical steps and into the actual craft of great captioning. The quality of your captions says a lot about your content, and getting it right makes your message clear, professional, and inclusive.
These best practices are rooted in established accessibility guidelines, and they're all designed to make your video understandable for everyone, especially viewers who are deaf or hard of hearing.
Follow Professional Formatting Standards
Readability is everything. If your viewers have to squint, pause, or reread your captions, they're going to get frustrated and tune out. Professional captioning follows a few simple but powerful rules to keep the text clean and effortless.
The two big ones are:
- Line Length: Keep each line of text under 42 characters. This stops viewers' eyes from darting back and forth, which gets exhausting fast.
- Line Count: Never use more than two lines of captions on the screen at once. A third line just creates a wall of text that clutters the video.
Sticking to these standards makes the whole experience smooth. The goal is for the captions to feel like a natural part of the video, not a chore to read.
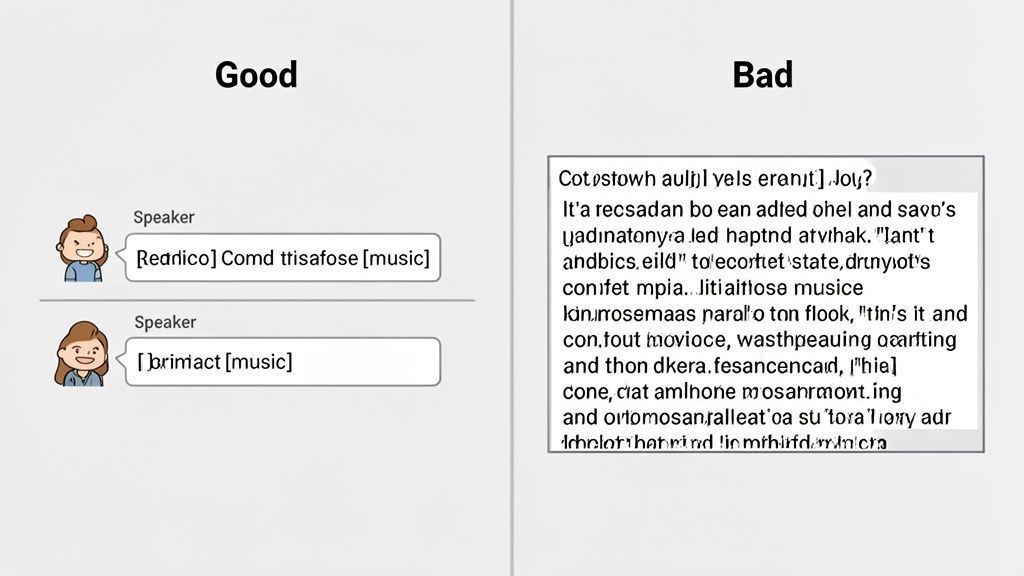
Describing Important Non-Speech Sounds
So much of a video's story is told through audio cues that aren't dialogue. Imagine watching a horror movie without the sound—you’d miss the creaking doors and sudden musical stabs that build all the tension. Good captions have to account for these crucial audio elements.
These descriptions, usually put in brackets, give context that words alone can't.
[soft music playing][audience applauds][door slams shut][dog barks]
A Note on Nuance: Don't go overboard. You only need to describe sounds that are actually important for understanding the scene. A random cough in the background probably doesn't need a caption, but a main character sighing in frustration absolutely does.
Getting this right is essential for giving every viewer an equitable experience.
Identifying Speakers Clearly
In any video with more than one speaker, you have to make it clear who's talking. This is especially true for interviews, panel discussions, or any scene where a speaker is off-camera. Without speaker IDs, a conversation quickly turns into a confusing mess of unattributed lines.
There are a couple of ways to handle this:
- Name Labels: Use the speaker’s name in brackets, like
[Jane Doe], right before their dialogue starts. - Hyphens: A common method is to use a hyphen and a new line when the speaker changes, especially if they are both clearly visible on screen.
Here’s a quick look at why this matters in a simple two-person interview:
| Bad Example (Confusing) | Good Example (Clear) |
|---|---|
| Hey, thanks for having me. I'm excited to talk about this. | Jane Doe: Hey, thanks for having me. |
| We’re thrilled to have you here. Let’s start with the data. | John Smith: We’re thrilled to have you here. Let’s start… |
Clear identification removes all the guesswork and makes the content accessible to everyone. The importance of these details is only growing as online video explodes. The video streaming market alone is projected to hit about USD 787 billion by 2035—a massive jump driven by digital content. You can discover more about the video streaming market growth on futuremarketinsights.com. As more creators make captioning a standard part of their workflow, they're aligning with a huge economic shift where clarity and accessibility drive viewer retention.
Common Questions About Video Captioning
As you get the hang of adding closed captions to your videos, a few questions always seem to surface. Think of this as your go-to guide for clearing up that last bit of confusion so you can nail down your workflow. These are the little details that often trip people up, but the answers are pretty straightforward once you see them laid out.
Captions vs Subtitles What Is the Difference
This is, without a doubt, the most common mix-up. People use these terms interchangeably all the time, but they actually serve two very different functions.
Closed captions (CC) are built for viewers who can't hear the audio. They don't just transcribe what's being said; they also describe crucial non-speech sounds that add context, like [music playing] or [door slams].
Subtitles, on the other hand, are for people who can hear just fine but don't understand the language being spoken. They are purely a translation of the dialogue. If your goal is true accessibility for the deaf and hard of hearing, you need captions—subtitles alone won't cut it.
SRT vs VTT Which Caption File Should I Use
When you export your captions, you'll likely see two main options: SRT (SubRip Text) and VTT (WebVTT). Honestly, for most day-to-day use, they’re almost identical. Both are simple text files that contain the caption text plus the start and end times for when each line should appear.
So what's the difference?
- SRT: This is the old-school, tried-and-true format. It's simple, reliable, and supported by pretty much every video player and platform on the planet. If you’re ever unsure, SRT is your safest bet.
- VTT: This is the newer, more modern version. It can do everything an SRT can do, plus it supports extra styling options like text coloring and positioning. The catch is that not all video players will actually display those fancy extras.
Our Recommendation: Just stick with SRT. For maximum compatibility across YouTube, Vimeo, and social media, it's the universal standard that will always work reliably.
How Accurate Is AI Captioning Really
This is a huge one, because the answer has changed so much over the last few years. Early AI transcription was a bit of a joke, but modern tools running on models like OpenAI's Whisper can hit up to 99% accuracy on clear audio. That's more than good enough for the vast majority of marketing, educational, or corporate videos out there.
Of course, no AI is perfect. Accuracy can take a hit when you throw it a curveball, such as:
- Lots of background noise
- Thick accents or people talking over each other
- Industry-specific jargon or unique brand names
Even then, the AI gives you an incredible first draft. A few minutes of clean-up is way faster than spending hours transcribing from scratch.
Can I Add Captions to an Already Published Video
Absolutely. Pretty much every major video platform is designed for this.
On YouTube and Vimeo, you can just pop into your video's settings at any time, upload a new SRT or VTT file, and you're done. The platform will add the "CC" button to your video player without messing with your view count or other metrics.
The only exception is if you "burned-in" the captions directly onto the video file for social media. In that case, you’d have to re-render the video with the new captions and re-upload it.
Ready to stop wrestling with manual transcription and start generating accurate captions in minutes? Transcript.LOL uses cutting-edge AI to deliver SRT and VTT files faster than any other method. Try it for free and see how simple captioning can be.