Best podcast equipment for beginners: Essential gear for...
Discover the best podcast equipment for beginners with a concise gear guide to mics, interfaces, and starter gear for pro-quality sound.
Kate, Praveen
February 9, 2026
Quando sei agli inizi, la migliore attrezzatura per podcast si riduce spesso a due elementi chiave: un microfono USB solido e di alta qualità (come l'affidabile Samson Q2U) e un buon paio di cuffie cablate.
Questa semplice combinazione è il punto di partenza perfetto. Ti permette di evitare il mondo confuso di mixer e interfacce audio, così puoi ottenere un audio pulito e professionale fin da subito.
Il Tuo Viaggio nel Podcasting Inizia con un Suono Eccezionale
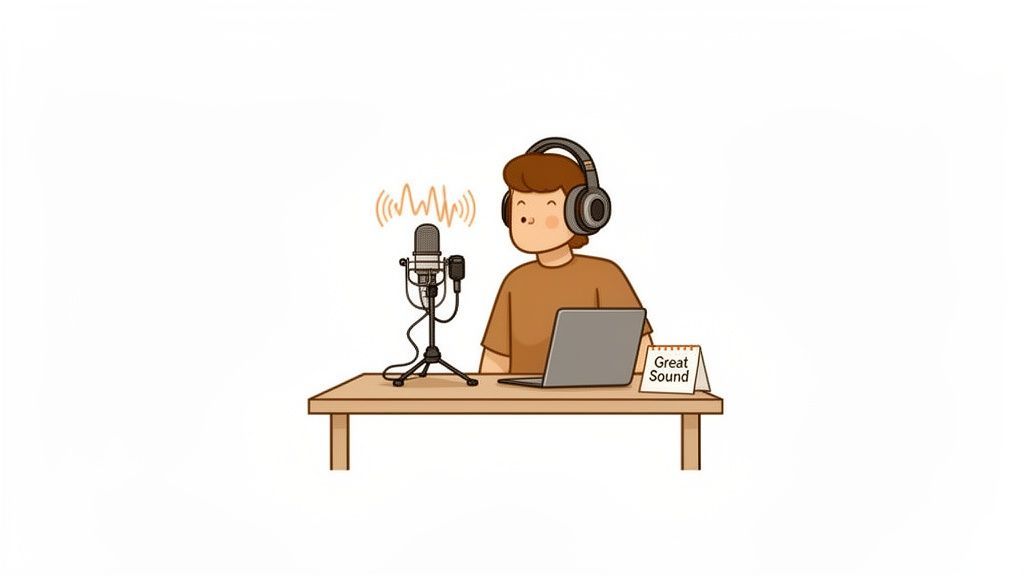
Benvenuto nell'entusiasmante mondo del podcasting! Prima di premere il tasto di registrazione e condividere le tue idee con milioni di potenziali ascoltatori, parliamo dell'unica cosa che distingue veramente i podcast eccezionali da quelli dimenticabili: la qualità audio.
La buona notizia? Non hai bisogno di uno studio di registrazione super attrezzato per suonare in modo incredibile. Questa guida è la tua tabella di marcia per trovare l'attrezzatura migliore e adatta ai principianti, per tagliare il gergo e aiutarti a fare scelte con sicurezza.
Considerala come il tuo foglio di appunti personale per costruire un setup di alta qualità e conveniente che faccia risaltare i tuoi contenuti fin dal primo episodio. Un ottimo setup non riguarda solo il suono professionale, ma anche il rispetto del tempo del tuo ascoltatore e il far sentire il tuo messaggio, forte e chiaro.
Good Audio = Listener Retention
Listeners forgive minor mistakes, but poor audio drives them away instantly. Clear, clean sound keeps people engaged longer and makes your podcast feel professional from the very first episode. Great gear isn’t luxury it’s credibility.
What Really Matters for Beginners
As a beginner, your goal is clarity and reliability, not complexity. You want gear that's easy to set up and just works, delivering clean audio every single time. You can always upgrade your kit as your show grows.
For now, focus on these three things:
- Ease of Use: Your gear should feel intuitive. You want to spend your time creating amazing content, not fighting with tech.
- Audio Clarity: The main mission is to capture your voice without distracting hiss, echo, or background noise.
- Reliability: Go with gear that has a proven track record. The last thing you want is for your microphone to die halfway through a killer interview.
To kick things off, let's look at the absolute must-haves for any new podcaster. These four items form the core of your starter studio.
Build Your Starter Studio the Smart Way
Capture Clean Voice
Your microphone should isolate your voice and reject background noise. Clean input reduces editing time and instantly improves perceived quality.
Monitor Everything
Headphones let you hear problems in real time. Catching noise or distortion during recording saves hours of fixing later.
Stable Positioning
A solid stand or boom arm keeps the mic steady and consistent. Small bumps or vibrations can quietly ruin an otherwise perfect take.
Quiet Environment
Even basic gear sounds professional in a treated room. Soft surfaces and fewer reflections matter more than expensive hardware.
Attrezzatura Essenziale per Iniziare un Podcast in Sintesi
| Tipo di Attrezzatura | Ruolo Principale | Cosa Cercare |
|---|---|---|
| Microfono | Cattura la tua voce | USB per semplicità, buon rifiuto del rumore |
| Cuffie | Monitorano il tuo audio | Design chiuso per evitare la fuoriuscita del suono |
| Supporto Microfono/Braccio | Posiziona correttamente il microfono | Stabilità, regolabilità, montaggio da scrivania o a pavimento |
| Filtro Anti-Pop | Attenua i suoni aspri | Schermo in rete o schiuma, adatto al tuo microfono |
Questa semplice configurazione in quattro parti è tutto ciò di cui hai bisogno per registrare audio di alta qualità.
Le configurazioni per podcast per principianti più efficaci sono semplici e affidabili. Una configurazione di base in un buon ambiente di registrazione supererà sempre l'attrezzatura costosa in una stanza con scarsa acustica. Spegnere un condizionatore d'aria è gratuito e può migliorare il tuo suono più di un nuovo microfono.
In definitiva, la tua attrezzatura dovrebbe passare in secondo piano, lasciando che la tua voce e il tuo messaggio siano al centro della scena. Questa guida ti aiuterà a scegliere i pezzi che fanno esattamente questo, assicurando che il tuo percorso nel podcasting inizi con una nota forte e chiara.
Una volta che avrai perfezionato le tue registrazioni, avrai bisogno di un flusso di lavoro intelligente per la post-produzione. Puoi saperne di più su come semplificare questo processo sul nostro blog.
Speed Up Your Post-Production with AI
Instead of manually typing or formatting notes, upload your episode and get a clean, ready-to-use transcript in minutes. Perfect for editing, captions, and repurposing content fast.
IA all'avanguardia
Alimentato da Whisper di OpenAI per una precisione leader nel settore. Supporto per vocabolari personalizzati, file fino a 10 ore e risultati ultra rapidi.

Importa da più fonti
Importa file audio e video da varie fonti tra cui caricamento diretto, Google Drive, Dropbox, URL, Zoom e altro.
Esporta in più formati
Esporta le tue trascrizioni in più formati tra cui TXT, DOCX, PDF, SRT e VTT con opzioni di formattazione personalizzabili.
Comprendere gli Elementi Essenziali del Podcast: I Quattro Fondamentali
Costruire il tuo primo setup per podcast può sembrare un'impresa enorme, ma non deve esserlo. Dimentica per un attimo tutta l'attrezzatura complicata che vedi negli studi professionali. Per ottenere un audio di grande qualità, hai davvero bisogno solo di padroneggiare quattro pezzi chiave di equipaggiamento.
Pensala come la tua "Core Four". Se fai bene queste cose, avrai una base solida per produrre un suono di qualità professionale fin dal primo giorno. Analizziamo esattamente cosa sono e cosa fanno, in modo che tu possa costruire il tuo setup con fiducia.
Il Microfono: La Porta d'Ingresso della Tua Voce
Il tuo microfono è, senza dubbio, la parte più importante del tuo setup. È la primissima cosa che la tua voce tocca. Pensalo come l'obiettivo della fotocamera di un fotografo: un ottimo obiettivo cattura un'immagine nitida e vibrante, mentre uno economico rende tutto sfocato e spento. Il tuo microfono fa lo stesso per la tua voce.
Per i principianti, i microfoni generalmente si presentano in due gusti:
- Microfoni USB: Sono le fotocamere "punta e scatta" del mondo audio. Li colleghi direttamente alla porta USB del tuo computer e sei pronto per partire. Tutto ciò di cui hanno bisogno per funzionare è integrato, rendendoli un'opzione fantastica e senza problemi per chiunque stia iniziando.
- Microfoni XLR: Sono più simili alle "fotocamere DSLR". Offrono una qualità superiore e maggiore flessibilità, ma necessitano di un pezzo di equipaggiamento separato - un'interfaccia audio - per comunicare con il tuo computer. Questo percorso ti offre una pista molto migliore per futuri aggiornamenti.
Quando cerchi in giro, scoprirai che molti degli stessi principi per catturare una voce chiara si applicano a diversi campi. Le guide per i migliori microfoni da gaming spesso hanno confronti utili che possono aiutare anche i podcaster.
L'Interfaccia Audio: Il Tuo Traduttore Personale
Se scegli la strada del microfono XLR, avrai bisogno di un'interfaccia audio. Questa piccola scatola è un traduttore. Il tuo microfono professionale parla un linguaggio analogico, ma il tuo computer capisce solo il digitale. L'interfaccia è il ponte che permette loro di comunicare perfettamente.
Ma fa più che tradurre. Gestisce anche alcuni altri compiti critici:
- Preamplificatori: Questa è fondamentalmente una manopola del volume per il tuo microfono. Amplifica il segnale molto debole proveniente dal microfono fino a un livello sano per la registrazione, il tutto senza aggiungere sibili o rumori extra.
- Alimentazione Phantom: Alcuni microfoni, noti come microfoni a condensatore, necessitano di un po' di alimentazione per funzionare. Un'interfaccia fornisce questo con un semplice pulsante, solitamente etichettato "+48V".
- Ingressi Multipli: La maggior parte delle interfacce ti permette di collegare più di un microfono. Questo è un must assoluto se hai intenzione di avere un co-host o intervistare ospiti di persona.
Pensa a un'interfaccia audio come al fulcro del tuo suono. Prende l'audio puro dal tuo microfono, gli fornisce alimentazione, controlla il suo volume e invia un segnale pulito e nitido al tuo computer, pronto per essere registrato.
Cuffie: Il Tuo Specchio Audio
Le cuffie non servono solo per ascoltare il tuo montaggio finale. Il loro compito più importante è farti sentire esattamente ciò che il tuo microfono sta catturando, in tempo reale, mentre stai registrando. È così che cogli quel basso ronzio del condizionatore d'aria, l'abbaiare del cane del vicino o quei suoni aspri di "p" e "b" prima che rovinino una ripresa altrimenti perfetta.
Per il podcasting, vuoi assolutamente cuffie cablate chiuse. Il design chiuso mantiene il suono nelle tue orecchie, in modo che non "trapeli" e venga catturato dal tuo sensibile microfono. Una connessione cablata assicura che non ci sia ritardo (latenza), quindi ciò che senti è ciò che sta accadendo in quel preciso momento.
Il mondo del podcasting è esploso. Il mercato globale, attualmente valutato a 31,49 miliardi di dollari, dovrebbe salire alle stelle fino a 114,48 miliardi di dollari entro il 2030. Quel boom significa che il solo settore dell'attrezzatura sta generando 285-300 milioni di dollari all'anno. Non sorprende che i kit di partenza come il Focusrite Scarlett 2i2 stiano andando a ruba. Puoi saperne di più su questo mercato in espansione e le sue tendenze su Mordor Intelligence.
Cavi e Supporti: Gli Eroi Non Celebrati
Ok, questi non sono gli articoli più glamour, ma non sottovalutarli. Un solido supporto per microfono o un braccio snodabile è non negoziabile. Tiene il tuo microfono nella posizione perfetta, lo mantiene stabile e previene che fastidiose vibrazioni dalla tua scrivania rovinino il tuo audio. Un buon supporto è la differenza tra un audio pulito e una registrazione piena di colpi e rimbombi distraenti.
Lo stesso vale per i tuoi cavi. Un cavo di qualità assicura che un segnale pulito e privo di interferenze arrivi dal tuo microfono all'interfaccia. Questi pezzi potrebbero non essere eccitanti, ma sono la spina dorsale affidabile che tiene insieme tutto il tuo setup. Si assicurano che tutto funzioni quando premi il pulsante di registrazione.
Scegliere la Tua Attrezzatura per Podcast per Qualsiasi Budget
Bene, conosci le parti essenziali di un setup per podcast. Ora la parte divertente: scegliere l'attrezzatura che si adatta al tuo show e al tuo portafoglio. Immergersi nel mondo delle apparecchiature audio può sembrare un po' opprimente, ma l'ho suddiviso in tre semplici livelli per renderlo facile.
Questo approccio ti aiuta a trovare quel punto ideale tra costo, qualità e darti spazio per crescere. Sia che tu stia mettendo insieme giusto il necessario per un microfono decente o che tu sia pronto a costruire un setup più serio, c'è un percorso chiaro da seguire. Diamo un'occhiata ad alcuni esempi reali in ogni categoria per eliminare le congetture.
Il Livello di Avvio Economico: Sotto i 150€
Se stai appena iniziando, la missione è semplice: ottenere un audio pulito e chiaro senza svuotare il portafoglio o impantanarsi nei dettagli tecnici. Questo livello si concentra sull'ottenere il massimo dal tuo denaro e dimostrare che non hai bisogno di una fortuna per suonare alla grande. Il cuore di questo setup è un solido microfono USB.
I microfoni USB sono popolari per un motivo: sono veramente plug-and-play. Hanno un'interfaccia audio integrata, quindi puoi collegarne uno direttamente al tuo computer e registrare in pochi minuti. Per ottenere il miglior suono per i tuoi soldi, vale la pena dare un'occhiata ai migliori microfoni USB economici che i principianti esperti raccomandano.
Un prodotto di spicco in questa categoria è il Samson Q2U. È un vero cavallo di battaglia che è stato un punto di riferimento per i podcaster per oltre un decennio perché è affidabile e suona bene. Include anche in modo intelligente sia connessioni USB che XLR, offrendoti un percorso di aggiornamento naturale quando sei pronto.
- Esempio di Microfono: Samson Q2U o Audio-Technica ATR2100x
- Esempio di Cuffie: Qualsiasi paio affidabile di cuffie cablate che hai, come le Sony MDR-ZX110.
- Vantaggio Chiave: Semplicità e convenienza. Puoi mettere insieme un kit di avvio completo e di qualità per ben meno di 150€.
Il Livello Appassionato di Fascia Media: 200€-500€
Questo è per il podcaster che è pronto a fare il salto di qualità. Se fai sul serio per la crescita del tuo show e pensi di avere ospiti o un co-host in futuro, questo è il posto perfetto per iniziare. La grande mossa qui è passare da un microfono USB a un microfono XLR abbinato a un'interfaccia audio dedicata.
Un setup XLR separa il tuo microfono dal "traduttore" (l'interfaccia), il che quasi sempre si traduce in un audio più pulito con meno sibili di fondo. Sblocca anche un mondo molto più ampio di microfoni professionali tra cui scegliere. Il Focusrite Scarlett 2i2 è una leggenda in questo campo, noto per i suoi fantastici preamplificatori e la sua solida affidabilità. Abbinalo a un microfono dinamico XLR come il Rode Procaster, e avrai una combinazione che offre quel suono ricco e classico da trasmissione.
Separando il microfono e l'interfaccia audio, ottieni un maggiore controllo sul tuo suono. Questo setup ti consente di regolare i tuoi livelli di guadagno in modo più preciso e di aggiungere facilmente microfoni multipli per le interviste.
Questo diagramma di flusso aiuta a visualizzare quella scelta fondamentale tra un semplice setup USB e un sistema XLR più flessibile.
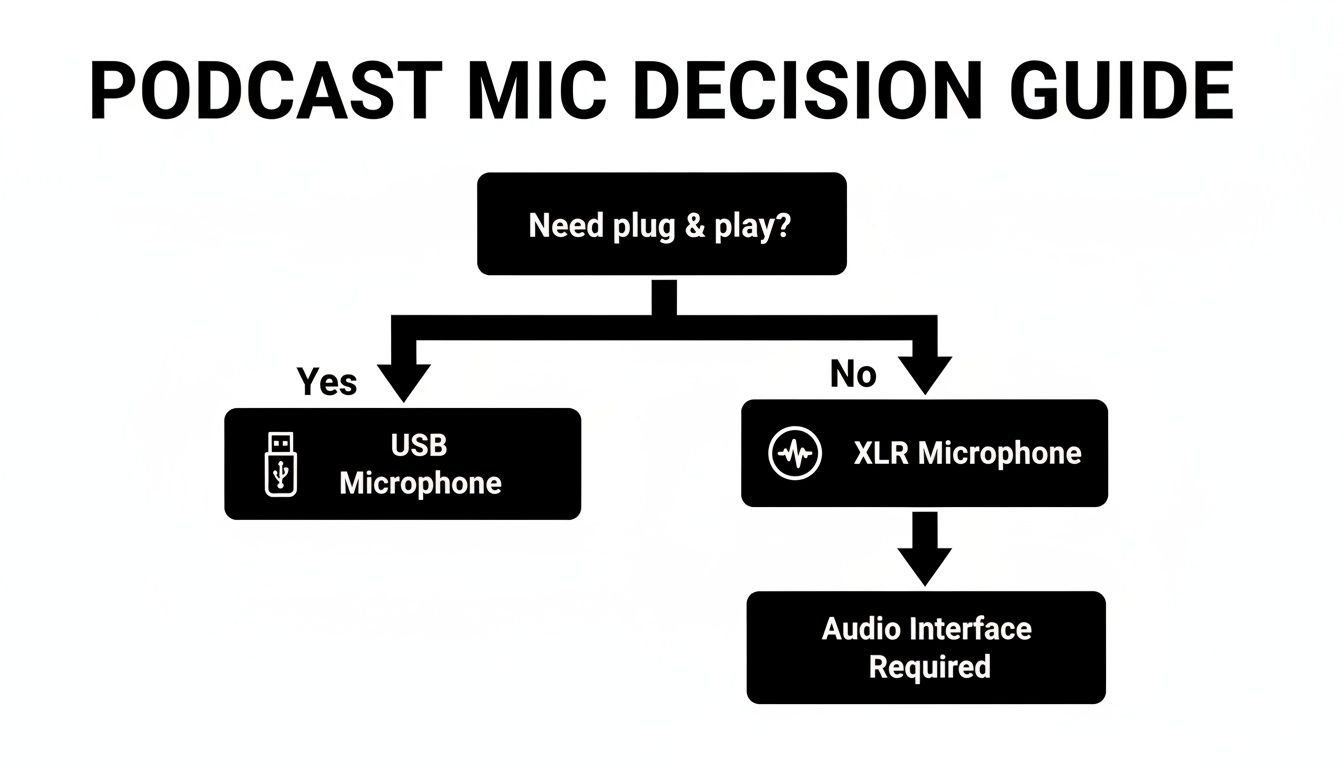
Si tratta davvero di convenienza contro a prova di futuro. Entrambi i percorsi possono darti un audio fantastico, ma la via XLR ti offre più spazio per espanderti.
Il Livello Aspirante Pro: 500€+
Per i creatori che vogliono suonare come se lo facessero da anni, fin dal primo episodio. Questo non significa comprare l'attrezzatura più costosa che riesci a trovare, ma investire in standard industriali entry-level, il tipo di attrezzatura di cui si fidano i professionisti delle trasmissioni di tutto il mondo.
Il re indiscusso qui è lo Shure SM7B. È un microfono leggendario famoso per il suo tono vocale caldo e indulgente e la sua incredibile capacità di rifiutare il rumore di fondo. È un microfono "affamato di guadagno", quindi è spesso abbinato a un'interfaccia di qualità e a un amplificatore di segnale come un Cloudlifter per ottenere il meglio da esso. Un'alternativa più moderna e user-friendly è lo Shure MV7+, un microfono ibrido USB/XLR ispirato all'SM7B che ti offre una qualità incredibile con meno problemi.
Investire a questo livello significa che la tua attrezzatura non sarà mai ciò che limita la qualità del tuo audio. È un costo iniziale maggiore, ma questa attrezzatura è costruita per durare una vita e crescerà con te man mano che il tuo podcast diventerà una produzione professionale. E una volta che avrai quelle registrazioni impeccabili, vorrai mantenere quella qualità professionale fino alla fine dando un'occhiata alle recensioni degli strumenti per post-produzione e trascrizione.
Per rendere la scelta un po' più facile, ecco una tabella che riassume le nostre raccomandazioni di attrezzatura per ogni budget.
Raccomandazioni di Attrezzatura per Podcast per Livello di Budget
| Livello | Esempio Microfono | Esempio Interfaccia | Esempio Cuffie | Costo Stimato |
|---|---|---|---|---|
| Budget | Samson Q2U (USB/XLR) | Nessuna (Integrata) | Sony MDR-ZX110 | ~100€–150€ |
| Fascia Media | Rode Procaster (XLR) | Focusrite Scarlett 2i2 | Audio-Technica M20x | ~300€–500€ |
| Livello Pro | Shure SM7B o MV7+ | Universal Audio Volt 2 | Beyerdynamic DT 770 | ~500€+ |
Ricorda, l'attrezzatura "migliore" è quella che si adatta alle tue esigenze e al tuo budget in questo momento. Puoi sempre aggiornare in seguito man mano che il tuo show cresce. La cosa più importante è iniziare a creare.
Accessori che Elevano la Tua Qualità Audio

Hai sistemato gli articoli più costosi. Ora è il momento di parlare delle attrezzature più piccole, spesso ignorate, che fanno una differenza enorme. Questi accessori sono la salsa segreta che porta il tuo audio da "abbastanza buono" a genuinamente ottimo.
Pensali come il cast di supporto nel tuo show. Il microfono potrebbe avere i riflettori, ma questi strumenti lavorano silenziosamente in background, eliminando problemi audio comuni prima ancora che abbiano la possibilità di rovinare una ripresa perfetta. Soprattutto, sono alcuni degli aggiornamenti più convenienti che puoi fare.
Analizziamo i quattro accessori più efficaci per qualsiasi podcaster alle prime armi.
Domare le Plosive con Filtri Anti-Pop e Schermature Antivento
Hai mai sentito quel forte e tonante "pop" quando qualcuno dice una parola con una 'P' o una 'B' in una registrazione? Quelle sono plosive, e accadono quando una raffica d'aria dalla tua bocca colpisce il diaframma sensibile del microfono.
Sono incredibilmente distraenti per gli ascoltatori e un incubo da risolvere in fase di montaggio.
È esattamente per questo che esiste un filtro anti-pop. È un semplice schermo di rete o schiuma che si posiziona tra te e il tuo microfono, interrompendo quella raffica d'aria prima che possa causare un problema.
- Filtri Anti-Pop a Rete: Questo è lo stile classico che si aggancia al tuo supporto per microfono. Offrono una protezione di prim'ordine senza alterare il tuo suono.
- Schermature Antivento in Schiuma: Queste sono le palline di schiuma che si infilano direttamente sul microfono. Sono super convenienti ma a volte possono attutire la brillantezza degli alti nella tua voce.
Per la maggior parte delle persone che iniziano, un filtro anti-pop a rete di base è la scelta migliore. È un pezzo economico della migliore attrezzatura per podcast per principianti che offre un risultato immediato e dall'aspetto professionale.
Fissare il Tuo Microfono con Supporti e Bracci Snodabili
Cercare di registrare con il microfono appoggiato su una pila di libri è una ricetta per il disastro. Ogni singolo tocco, urto o vibrazione sulla tua scrivania si trasferirà direttamente al microfono, creando un rumore basso e rimbombante che rende il tuo audio confuso.
Un supporto per microfono adeguato è assolutamente non negoziabile per registrazioni pulite.
Hai due scelte principali qui:
- Supporti da Tavolo: Sono supporti piccoli e semplici che si appoggiano direttamente sulla tua scrivania. Sono economici e portatili, ma è anche molto più probabile che catturino vibrazioni dalla tua tastiera e dal tuo mouse.
- Bracci Snodabili: Questi sono i bracci regolabili che si agganciano al lato della tua scrivania. Ti offrono un posizionamento molto migliore, permettendoti di posizionare il microfono esattamente dove ti serve, mantenendolo completamente isolato dal rumore della scrivania.
Un braccio snodabile è un investimento fantastico per qualsiasi podcaster serio. Libera lo spazio sulla tua scrivania e assicura che il tuo microfono sia sempre nella posizione perfetta.
Assorbire le Vibrazioni con un Supporto Anti-Shock
Un supporto anti-shock è la tua prossima linea di difesa contro rumori indesiderati. Pensalo come un sistema di sospensione per il tuo microfono. Il microfono è tenuto in un telaio da elastici, che assorbono le minuscole vibrazioni che viaggiano lungo il supporto dalla scrivania o dal pavimento.
Se un braccio snodabile isola il tuo microfono dalla scrivania, un supporto anti-shock lo isola dal braccio snodabile stesso. Insieme, creano una potente difesa contro urti accidentali, passi e altri rimbombi a bassa frequenza che possono rovinare una ripresa.
Non tutti i microfoni necessitano di uno separato; alcuni hanno persino l'assorbimento degli urti integrato. Ma se senti ancora misteriosi tonfi nelle tue registrazioni, un supporto anti-shock è spesso la soluzione perfetta.
Controllare il Tuo Spazio con il Trattamento Acustico
Infine, parliamo dell'accessorio più importante di tutti. Non è qualcosa che attacchi alla tua attrezzatura; è la stanza in cui registri.
Superfici dure e piatte come muri spogli, finestre e pavimenti in legno sono il tuo nemico. Riflettono il suono, creando l'eco e il riverbero che fanno suonare l'audio vuoto, distante e poco professionale.
Non hai bisogno di costruire uno studio di livello professionale. Un po' di trattamento acustico fai-da-te può fare miracoli:
- Registra in un armadio a muro: Tutti quei vestiti sono fantastici assorbitori naturali del suono. Seriamente, funziona.
- Appendi coperte pesanti: Appendile ai muri intorno alla tua area di registrazione per eliminare le riflessioni.
- Usa cuscini e imbottiture: Posizionali strategicamente negli angoli e sulle superfici piane per interrompere le onde sonore.
L'obiettivo è "smorzare" la stanza aggiungendo superfici morbide e irregolari che assorbono il suono invece di rimbalzarlo. Questo semplice - e spesso gratuito - passaggio può migliorare il tuo audio più di un microfono che costa centinaia di dollari.
Come Configurare la Tua Nuova Attrezzatura per Podcast
Disimballare nuova attrezzatura è sempre un'emozione, ma la vera magia avviene quando la colleghi. Un setup solido è il ponte tra possedere la migliore attrezzatura per podcast per principianti e creare effettivamente quell'audio nitido e professionale che stai cercando.
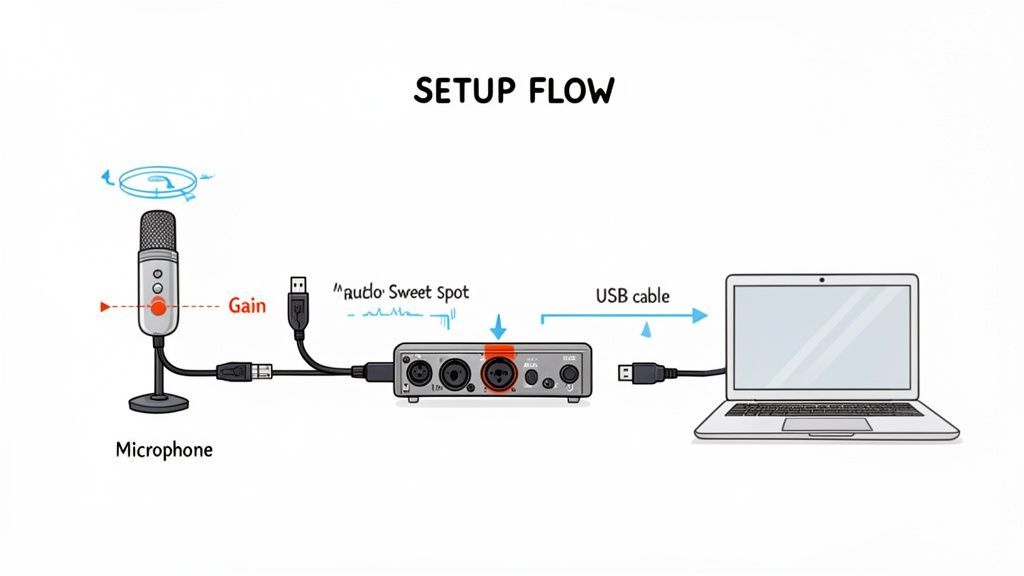
Esaminiamo il setup più comune per principianti: un microfono XLR collegato a un'interfaccia audio, che a sua volta si collega al tuo computer. Sembra tecnico, ma è sorprendentemente semplice e ti offre un setup di registrazione potente e flessibile.
La Catena di Connessione di Base
Pensa al tuo setup come a un semplice percorso per il tuo suono. Va da te, nel microfono, attraverso l'interfaccia (dove viene convertito da suono analogico a dati digitali) e infine nel tuo computer.
Ecco come collegare tutto, passo dopo passo:
- Microfono all'Interfaccia: Prendi il tuo cavo XLR. Un'estremità si collega alla parte inferiore del tuo microfono e l'altra va nel primo jack di ingresso sulla tua interfaccia audio. Facile.
- Interfaccia al Computer: Usa il cavo USB che è venuto con la tua interfaccia per collegarla a una porta USB libera sul tuo laptop o desktop. Il tuo computer dovrebbe riconoscerla automaticamente come un nuovo dispositivo audio.
- Cuffie all'Interfaccia: Collega le tue cuffie cablate direttamente al jack delle cuffie sulla parte anteriore dell'interfaccia. Questo è fondamentale per monitorare il tuo audio in tempo reale senza alcun ritardo.
- Attiva l'Alimentazione Phantom (Se Necessario): Se stai usando un microfono a condensatore, dovrai premere il pulsante "+48V" sulla tua interfaccia. Questo invia una piccola carica elettrica per alimentare il microfono. I microfoni dinamici non ne hanno bisogno, quindi puoi lasciarlo spento.
Questa semplice catena è la base per innumerevoli home studio. È un setup che sta alimentando un mercato di attrezzature per podcast che ha superato i 3,7 miliardi di dollari solo in Nord America. Con oltre 4,5 milioni di podcast in circolazione, un setup pulito e affidabile è il tuo primo passo per distinguerti. Puoi approfondire altre statistiche su come il boom dei podcast sta plasmando il mercato delle attrezzature.
Trovare il Livello di Guadagno Perfetto
Una volta che sei tutto collegato, il tuo compito più importante è impostare il guadagno. La manopola del guadagno non è un controllo del volume; è un controllo di sensibilità. Dice al microfono quanto della tua voce catturare prima che il segnale raggiunga il tuo computer.
Ottenere questo giusto è un atto di bilanciamento:
- Troppo Basso: La tua voce sarà troppo bassa e quando la alzerai in seguito, alzerai anche tutti i sibili e i rumori di fondo.
- Troppo Alto: Il tuo audio andrà in "clipping". Questo crea un suono stridente e distorto, impossibile da correggere in post-produzione. È un killer della registrazione.
Il tuo obiettivo è parlare al tuo normale volume di podcasting e vedere il misuratore sulla tua interfaccia o sul software di registrazione rimbalzare costantemente nel giallo. Vuoi che si avvicini al rosso, ma senza mai, mai toccarlo. Questo ti dà un segnale forte e pulito con ampio margine per il montaggio.
Inizia con la manopola del guadagno completamente abbassata. Premi registra, inizia a parlare e alzala lentamente finché non trovi quel punto ideale. È una regolazione di cinque secondi che fa tutta la differenza.
Padroneggiare la Tecnica del Microfono
L'ultimo pezzo del puzzle è totalmente gratuito e può far suonare un microfono economico come un modello professionale: una buona tecnica del microfono. Si tratta di come ti posizioni.
- Distanza: Cerca di rimanere a circa 10-15 cm dal microfono. Questo è il punto ideale per la maggior parte dei microfoni vocali, catturando un tono caldo e presente senza suonare rimbombante o captare troppo eco della stanza.
- Angolo: Non parlare direttamente al centro del microfono. Invece, punta la tua voce con un leggero angolo di 10-15 gradi. Questo aiuta a ridurre i suoni aspri di "S" (sibilanti) e i suoni "P" e "B" che esplodono (plosive).
La chiave è la coerenza. Cerca di mantenere la stessa distanza durante tutta la registrazione per evitare strani salti di volume. Queste semplici modifiche fisiche sono importanti quanto l'attrezzatura stessa.
Una volta che hai padroneggiato la registrazione, il passo successivo è la post-produzione. Per saperne di più su quella parte del processo, consulta la nostra documentazione sui flussi di lavoro di post-produzione.
7. Il Tuo Flusso di Lavoro: Dalla Registrazione alla Pubblicazione
Registrare il tuo primo episodio è una pietra miliare enorme, ma il vero lavoro inizia dopo aver premuto stop. Un flusso di lavoro di post-produzione intelligente è ciò che separa uno show rifinito e dall'aspetto professionale dall'audio grezzo, e può farti risparmiare un'incredibile quantità di tempo.
È qui che molti nuovi podcaster si bloccano. Il viaggio da un file audio grezzo a un episodio pubblicato coinvolge editing, missaggio e preparazione del tuo contenuto in modo che le persone possano effettivamente trovarlo. È facile dedicare più tempo a questi compiti noiosi che a creare il tuo prossimo episodio.
Ma non deve essere così. Un processo ben pianificato fa tutta la differenza, e uno degli strumenti più potenti nel toolkit di un podcaster moderno è la trascrizione. Non è più solo un "nice-to-have" per l'accessibilità; è un motore di contenuti.
Trasformare l'Audio in Asset con la Trascrizione
Una trascrizione è semplicemente una versione testuale parola per parola del tuo episodio. Digitarla manualmente è un compito che distrugge l'anima, specialmente se vuoi pubblicare con costanza. È qui che i servizi basati sull'IA diventano l'arma segreta di un podcaster, colmando il divario tra registrazione e promozione.
Don’t Waste Hours on Manual Transcripts
Hand-typing transcripts can take 4–6× the length of your episode. That’s hours lost every week. Automation saves time you could spend recording, promoting, or growing your audience.
Una trascrizione accurata è la base per rendere il tuo podcast più scopribile, accessibile e versatile. Sblocca il pieno valore del tuo audio trasformando le parole pronunciate in contenuti ricercabili e riutilizzabili.
Automatizzare questo singolo passaggio apre istantaneamente un mondo di nuove possibilità per il tuo show.
- Migliora la tua SEO: I motori di ricerca non possono ascoltare il tuo audio, ma possono indicizzare il testo. Inserire una trascrizione completa sul tuo sito web rende il tuo intero episodio ricercabile, aiutando i nuovi ascoltatori a trovarti tramite una semplice ricerca su Google.
- Migliora l'accessibilità: Le trascrizioni garantiscono che i tuoi contenuti siano accessibili a persone sorde o con problemi di udito, il che significa un pubblico potenziale più ampio per te.
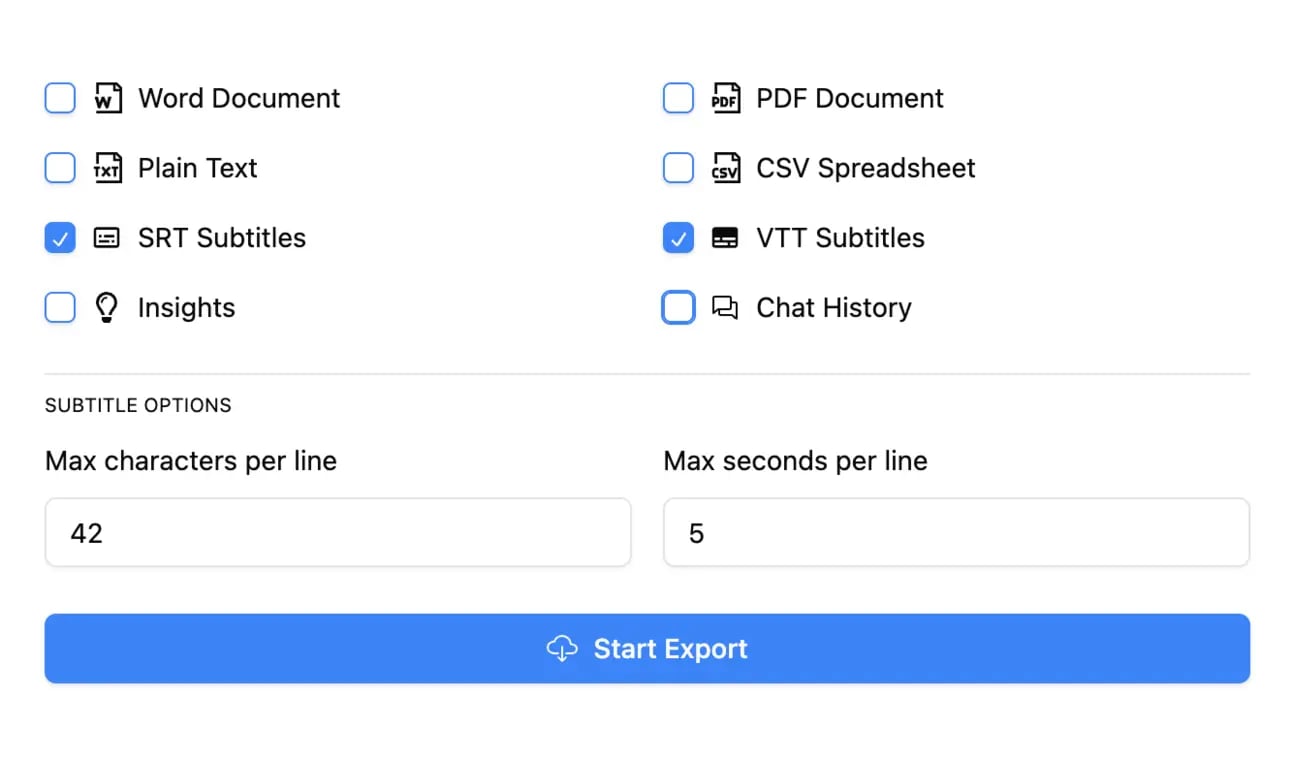
- Crea sottotitoli: Puoi esportare facilmente la tua trascrizione come file SRT o VTT per aggiungere sottotitoli perfetti ai clip video per i social media. Questo è fondamentale, poiché una grande quantità di video viene guardata senza audio.
L'Effetto Moltiplicatore dei Contenuti
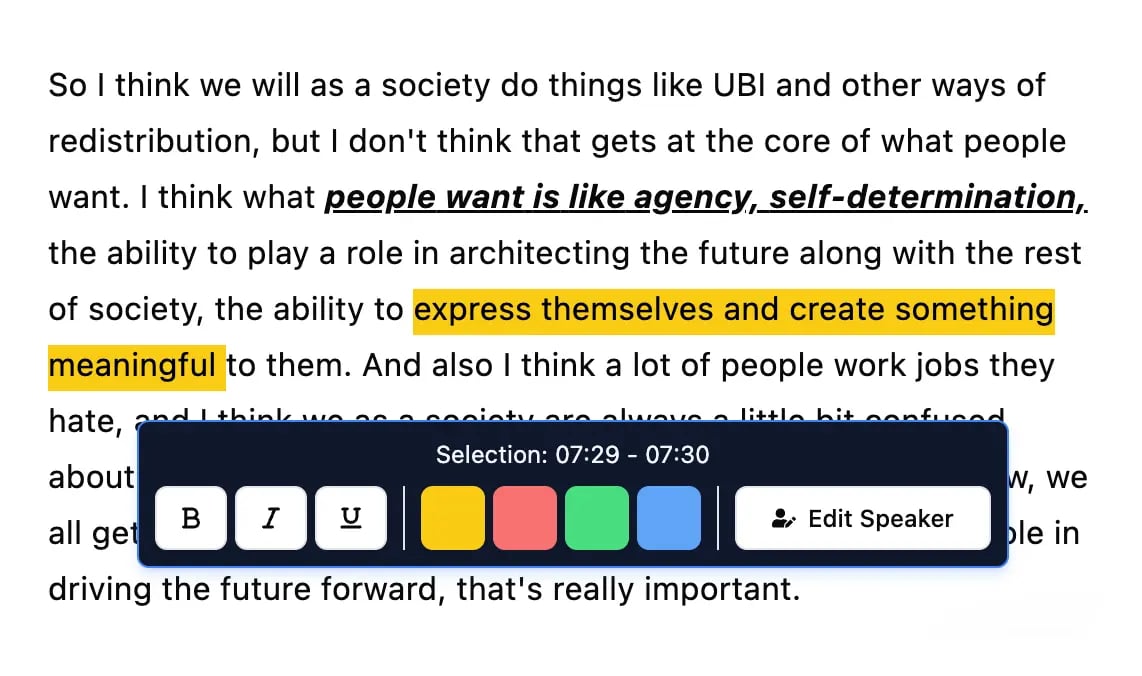
È qui che un servizio come Transcript.LOL può cambiare completamente il tuo processo. Invece di fornirti solo un muro di testo, agisce come un centro di comando post-produzione.
La piattaforma è costruita attorno a una semplice interfaccia drag-and-drop per caricare il tuo audio.
Questo screenshot mostra quanto sia facile ottenere una trascrizione accurata e con etichette dei relatori in pochi secondi.
Una volta che il tuo audio è stato elaborato, inizia la vera magia. Puoi utilizzare strumenti AI integrati per generare istantaneamente tutti i tipi di contenuti direttamente dalla tua trascrizione. Questo trasforma una singola registrazione in un pacchetto di marketing completo.
Turn Transcripts Into Ready-to-Publish Content

Rilevamento dei parlanti
Identifica automaticamente diversi parlanti nelle tue registrazioni e etichettali con i loro nomi.
Strumenti di modifica
Modifica le trascrizioni con strumenti potenti tra cui trova e sostituisci, assegnazione dei parlanti, formati di testo arricchito ed evidenziazione.
Riassunti e Chatbot
Genera riassunti e altri approfondimenti dalla tua trascrizione, prompt personalizzati riutilizzabili e chatbot per i tuoi contenuti.
Imagine generating your show notes, a quick summary, the key takeaways, and a dozen social media posts in minutes, not hours. This kind of efficiency maximizes the impact of all your hard work, letting you focus on what you do best: creating great content for your audience.
AI Is Now Standard for Creators
Modern podcasters don’t just record — they repurpose. Transcription and AI tools have become essential for faster publishing, better SEO, and consistent content across platforms.
Domande comuni sull'attrezzatura per podcast per principianti
Iniziare con il tuo primo acquisto di attrezzatura può sembrare di fissare un muro di manopole e acronimi. È facile sentirsi sopraffatti, ma fidati di me, fare la scelta giusta è più semplice di quanto sembri. Chiariremo alcune delle domande più comuni che i nuovi podcaster hanno.
Posso iniziare solo con un microfono USB?
Assolutamente. Un buon microfono USB è il modo più veloce e diretto per ottenere un audio eccellente fin dal primo giorno. È una vera soluzione plug-and-play che ti consente di saltare l'hardware aggiuntivo e iniziare subito a creare contenuti.
Detto questo, se il tuo budget ha un po' di margine, un'interfaccia audio e un microfono XLR sono un investimento fantastico a lungo termine. Questa configurazione generalmente offre una migliore qualità del suono e ti offre un chiaro percorso di aggiornamento man mano che il tuo show cresce.
Qual è il pezzo di attrezzatura più importante?
Il tuo microfono. Senza dubbio. È la prima cosa che la tua voce tocca nella catena di registrazione e ha il maggiore impatto sul tuo suono finale. Una registrazione pulita da un ottimo microfono è un sogno da editare, ma una registrazione confusa e sottile è quasi impossibile da salvare.
Dai priorità all'ottenimento del miglior microfono che puoi permetterti, anche se ciò significa che devi iniziare con accessori più basilari. Un audio eccellente inizia nel momento in cui premi registra.
Come posso migliorare il suono senza spendere di più?
Questo è facile. Concentrati su due cose che non costano assolutamente nulla: la tua stanza e la tua tecnica microfonica. Seriamente, queste due modifiche possono fare una differenza enorme.
- Domina la tua stanza: Registra in uno spazio con molte superfici morbide. Un armadio pieno di vestiti è un classico per una ragione. Stanze con moquette, coperte pesanti o anche alcuni cuscini possono assorbire il suono ed eliminare quell'eco fastidioso.
- Perfeziona la tua tecnica: Mettiti a tuo agio parlando a circa 10-15 cm di distanza dal tuo microfono. Cerca di mantenere un angolo e una distanza costanti per mantenere i tuoi livelli audio fluidi e professionali.
Per ulteriori risposte a domande comuni sul podcasting, puoi esplorare la nostra dettagliata sezione FAQ.
Una volta catturato quell'audio perfetto, lascia che Transcript.LOL si occupi del resto. Trasforma istantaneamente le tue registrazioni in trascrizioni accurate, note dello show e contenuti per i social media, semplificando il tuo flusso di lavoro dalla registrazione alla pubblicazione. Inizia gratuitamente oggi.